- The verified AC technicians in our ProNearMe network report that 64 percent of monsoon water-ingress complaints on window ACs trace back to a single installation error: the chassis was mounted dead-level instead of tilted 10 to 15mm lower at the rear, sending condensate inside instead of out.
- A window AC sleeve must be anchored to a load-bearing wall using minimum 10mm masonry expansion anchors Plain plaster, partition walls, ACP cladding and aluminium window frames are not acceptable mounts under the National Building Code (NBC) of India 2016 structural-load guidance.
- The minimum circuit for a 1.5 ton window AC is a 16 amp C-curve MCB on a dedicated radial circuit Sharing the AC circuit with kitchen geysers, microwaves or motor pumps causes nuisance tripping within weeks and is flagged by the Central Electricity Authority (CEA) wiring regulations as non-compliant.
- A correctly silicone-sealed sleeve with a 30mm drip cap above and a 5-degree sloped sill below will keep an Indian monsoon out for the full design life of the unit Skipping any one of the three creates the conditions for capillary water ingress into the room.
- Tier 1 city installer rates ran ₹2,200 to ₹3,800 inclusive of GST in mid-2026 for a standard 1.5 ton window AC install Tier 2 rates ran ₹1,400 to ₹2,400. The price gap is almost entirely labour, not parts.
Getting window ac installation right is what separates a unit that runs 12 years from one that fails in three. Window ACs are the quiet survivors of the Indian cooling market.
Splits dominate metro showrooms, but tier 2 and tier 3 cities, rental flats, hostels and older buildings with thick masonry walls still install lakhs of new window units every summer. Bureau of Energy Efficiency (BEE) shipment data shows window AC sales held above 18 percent of the residential category in 2024.
They remain the sensible choice when the building society refuses balcony outdoor units, or when the customer is renting and cannot drill a 65mm core hole through a 9-inch brick wall. The catch: a window AC's reliability depends almost entirely on how it is installed.
Get the sleeve, the slope and the seal right and the unit runs for 10 to 12 years with minimal trouble. Get any of those wrong and you will be chasing water leaks, rattles, MCB trips and a dead compressor inside three summers.
Amit has spent 14 years across 2,800+ service calls in Mumbai, Pune and Hyderabad, and the second most common service call our ProNearMe network handles every monsoon is window AC installation rework, almost always because the original fitter skipped the slope angle, the silicone bead or the dedicated MCB.
This guide walks through the seven-step installation sequence the way our verified ProNearMe AC technicians do it. For the wider context, see the parent pillar on AC installation complete guide India.

Get quotes from verified, top-rated AC Service & Repair pros in Delhi.
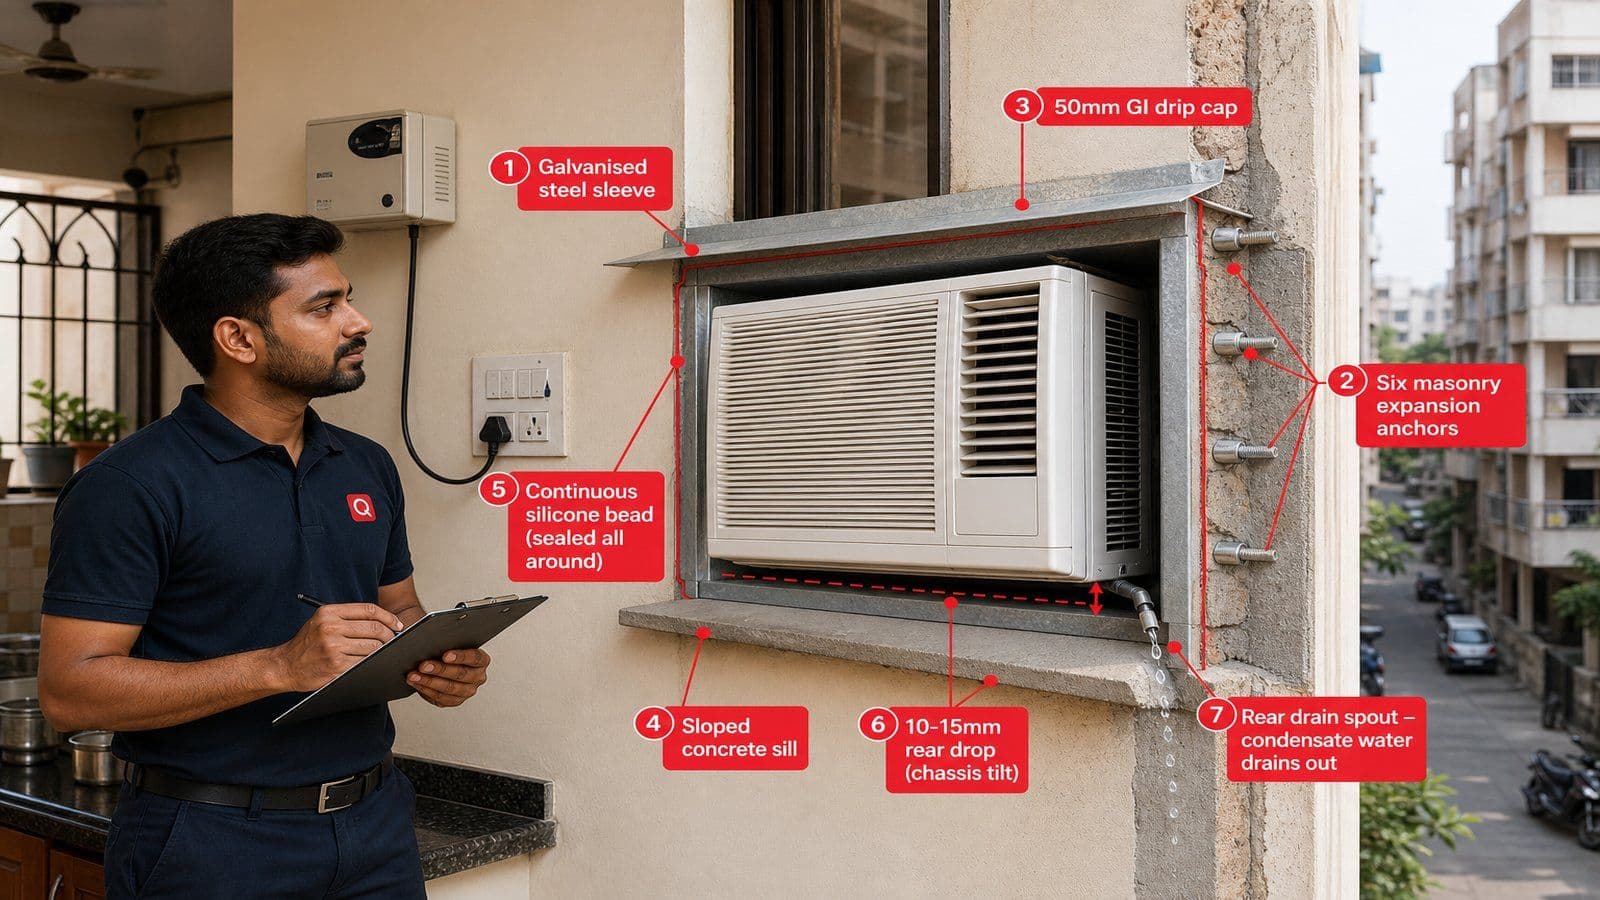
Photo: Window AC Sleeve Anatomy in Indian Apartment Wall
Why a Window AC Needs a Proper Sleeve
A window AC is a 40 to 55 kilogram chassis cantilevered out of a wall opening, with two-thirds of its weight sitting outside the building line. The job of the sleeve is to spread that load across the masonry, anchor it against wind suction, and create a waterproof boundary between indoors and the monsoon.
A unit dropped into a raw window opening without a sleeve will, within one or two summers, sag, vibrate the plaster loose, leak rainwater along its underside, and in worst cases drop onto the chajja below.
The sleeve is also the only practical way to remove the unit for service. Sleeves let the chassis slide in and out on internal runners so a technician can pull it forward 200mm for a chemical clean without dismantling the masonry seal.
Sleeve Material Options
Galvanised steel sleeves (typically 1.2mm GI with powder coat) are the default for residential installations. They take silicone well and last 15 to 20 years in coastal humidity. Aluminium sleeves flex more under load and are not recommended above 1 ton. Wooden frames rot in three to five monsoons and should be replaced with GI on every reinstall.
Step 1: Choosing the Right Sleeve Size
Window AC chassis dimensions are standardised across most Indian brands within tight tolerances, but sleeves are not. A sleeve that is 8mm too small will not let the chassis slide in. A sleeve that is 25mm too large will leave gaps that no amount of silicone can permanently seal.
Always confirm both the chassis dimensions from the owner's manual and the sleeve internal dimensions before ordering.
Typical internal sleeve dimensions by tonnage in 2026:
| AC Capacity | Sleeve Internal Width | Sleeve Internal Height | Sleeve Depth |
| 0.75 ton | 22 inches (560mm) | 14 inches (355mm) | 22 inches (560mm) |
| 1.0 ton | 24 inches (610mm) | 16 inches (405mm) | 24 inches (610mm) |
| 1.5 ton | 26 inches (660mm) | 17 inches (430mm) | 26 inches (660mm) |
| 2.0 ton | 30 inches (760mm) | 18 inches (455mm) | 28 inches (710mm) |
Treat the figures as nominal. Confirm by measuring the actual chassis you have purchased before drilling. Indian brands and imported brands sometimes differ by 10 to 20mm.
When the Window Opening Does Not Match
The existing opening rarely matches the sleeve perfectly. Three workable options. If the opening is larger than the sleeve, mount the sleeve and fill the surrounding gap with cement-mortar packing, then seal with silicone.
If the opening is smaller, the masonry needs widening with a core cutter; never force a sleeve into a tight opening, the stress cracks surrounding plaster within months.
If the opening is the wrong shape entirely (very tall and narrow, or arched), a custom GI sleeve fabricated by a local sheet metal centre costs ₹2,500 to ₹4,500 and saves the cost of altering the structural opening.
Step 2: Sleeve Mounting and the Load-Bearing Wall Check
This is the step DIY installers most often skip. A loaded sleeve and chassis weighs 55 to 80 kilograms, and during compressor start-up the unit transmits a brief torque pulse into its mounts.
Anchoring that into a 4-inch partition wall, an AAC block wall without through-bolts, or a thin plaster panel is asking for the chassis to work loose by the third or fourth summer.
Identify the wall type first. A structural load-bearing wall is typically 9-inch brick or 6-inch RCC. Tap the wall: a dull thud indicates solid masonry, a hollow ring indicates a partition. If in doubt, check the society's architect drawings or get a structural engineer's spot check.
NBC structural guidance requires any external wall penetration above the first floor to be sleeved into structural masonry only.
Once the wall is confirmed load-bearing, mount the sleeve using 10mm or 12mm zinc-plated masonry expansion anchors, minimum six per sleeve (two top, two bottom, one each side).
Drill with a hammer drill and a fresh masonry bit, vacuum dust from each hole before driving the anchor (residual dust reduces holding strength by 30 to 40 percent), and torque to manufacturer's specification. Never use plastic wall plugs and wood screws; they fail under cyclic vibration load.
Every monsoon we get called to flats in Andheri and Powai where the previous installer used plastic wall plugs in 4-inch partition walls because the customer asked for a quick fit. Six months later the chassis is sagging 20mm out of true and water is tracking down the inside plaster. The sleeve has to come out, the wall has to be reinforced with a steel ring frame, and the whole installation has to be redone. A proper expansion anchor job adds 30 minutes and ₹400 of hardware to the install. Skipping it costs the customer ₹6,000 to ₹9,000 to fix later.

Step 3: Tilt Angle and Why It Is the Opposite of Split AC Indoor Units
A split AC indoor unit is mounted dead-level. A window AC is the opposite. The rear of the sleeve (outdoor end) must sit 10 to 15mm lower than the front (indoor end) so condensate water in the drain pan runs out through the rear spout and falls outside the building. Get this backwards and condensate runs into the room.
The 10 to 15mm drop over a 600 to 700mm sleeve depth works out to roughly a 1.5 to 2 degree slope, enough for gravity drainage but not so steep that the chassis sits visibly crooked. Use a spirit level on the inside lip of the sleeve, then shim the rear down with thin metal packers between the sleeve and the masonry on the indoor face.
This is the single biggest source of monsoon callbacks our ProNearMe technicians handle. A window AC installed dead-level in May will not show the fault until the first heavy monsoon shower in June or July, by which point the carpet or timber window frame has already absorbed three weeks of slow water ingress.
Inverter Window ACs and Newer Drain Designs
Some 2024 and 2025 inverter window ACs use a slinger-ring condensate management system where the outdoor fan flings water onto the hot condenser coil to optimise heat rejection. These designs still need rear tilt, but the tolerance is tighter (8 to 12mm) because excess tilt causes water to escape the slinger ring and drip from the front.
Always check the brand's installation manual for the exact tilt specification.
Get quotes from verified, top-rated AC Service & Repair pros in Delhi.
Step 4: Monsoon Sealing With Silicone, Drip Cap and Sloped Sill
A window AC that is mechanically sound but poorly sealed will fail in three monsoons, usually as a stain on the plaster above the unit or a streak down the inside wall below. Three components together prevent ingress: a silicone bead around the sleeve perimeter, a drip cap above the sleeve, and a sloped sill below.
The silicone bead runs around the full perimeter of the sleeve on both indoor and outdoor faces, sealing the joint between the GI flange and the masonry opening. Use neutral-cure silicone (acetic-cure smells like vinegar and corrodes the GI), apply a continuous bead 6 to 8mm wide, and tool it smooth with a wet finger.
Never use ordinary plaster or POP; both crack within one heat-cycle season.
The drip cap is a 30 to 50mm GI or aluminium projection above the sleeve, fixed into the masonry with its own anchors, sloped 10 to 15 degrees down-and-outward. Its job is to break the sheet of water running down the external wall in a heavy shower so it cannot enter the silicone joint above the sleeve.
Most ready-made GI sleeves now include an integrated drip cap.
The sloped sill is the masonry or concrete below the sleeve, finished to slope 5 degrees outward so any water that collects drains away from the building. A flat or inward-sloping sill fails through capillary action even when silicone is applied correctly.

Photo: Technician Applying Silicone Bead Around Window AC Sleeve
Step 5: Electrical Load Check, Dedicated Circuit and the Correct MCB
A 1.5 ton window AC at compressor start-up draws a peak inrush current of 40 to 55 amps for a fraction of a second, then settles to 6 to 9 amps running. A 1 ton unit peaks at 28 to 38 amps with a 4 to 6 amp running draw. The MCB curve must ride through the inrush without nuisance tripping.
The correct MCB for a 1.5 ton window AC is a 16 amp C-curve single-pole breaker. C-curve breakers tolerate 5 to 10 times rated current for the few milliseconds of compressor start; B-curve (3 to 5 times) cannot. Using a B-curve MCB is the most common cause of mystery tripping in the first week. For 2 ton units, step up to a 20 amp C-curve MCB.
The cable from the MCB to the AC point must be a dedicated radial circuit, 2.5 square millimetre copper for runs under 10 metres, 4 square millimetre copper for longer runs. Central Electricity Authority (CEA) wiring regulations are explicit that ACs above 1 ton must be on dedicated circuits with their own MCB.
Sharing with a geyser, microwave or motor pump is non-compliant.
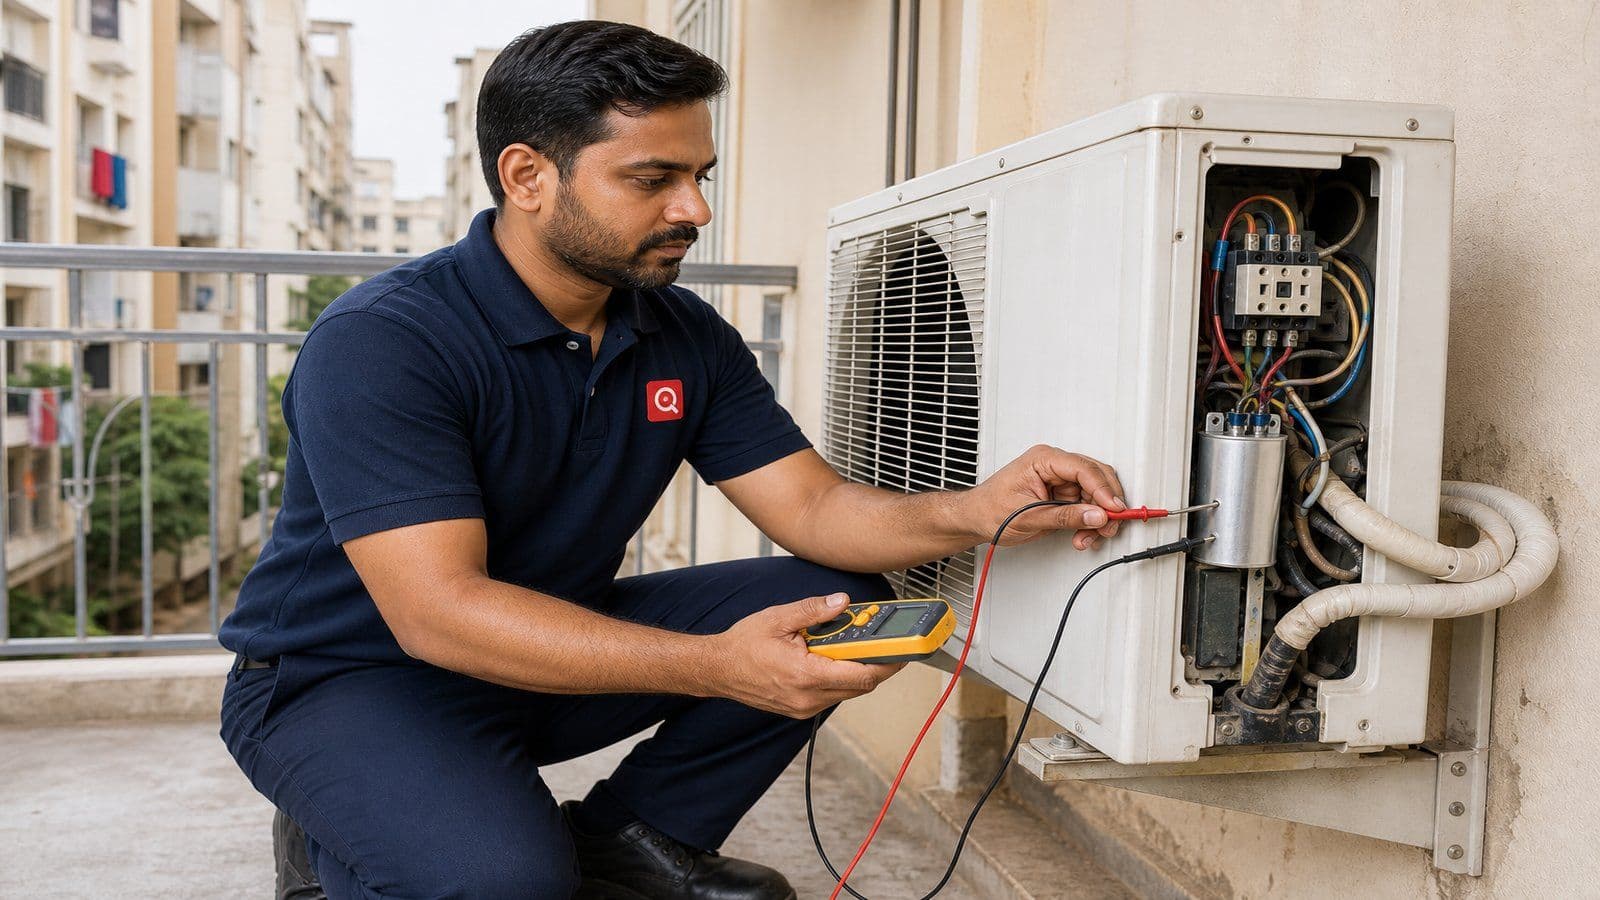
Earth wire continuity is non-negotiable. The third pin of the AC socket must be tied back to the main earth bus with continuous 2.5mm² green-yellow wire, no joints. Test with a multimeter; resistance under 1 ohm.
The Press Information Bureau (PIB) electrical-safety advisory and Ministry of Power (MoP) household-wiring guidance both flag missing earth continuity as a top-three electrocution risk in Indian homes.
Voltage Stabiliser Sizing
Indian grid voltage swings between 180V and 250V routinely in tier 2 and tier 3 cities. A 1.5 ton window AC needs a 4 kVA stabiliser with a working range of 140V to 280V; a 1 ton unit needs 3 kVA. Install the stabiliser before the AC point on the same dedicated circuit, never on a shared circuit.
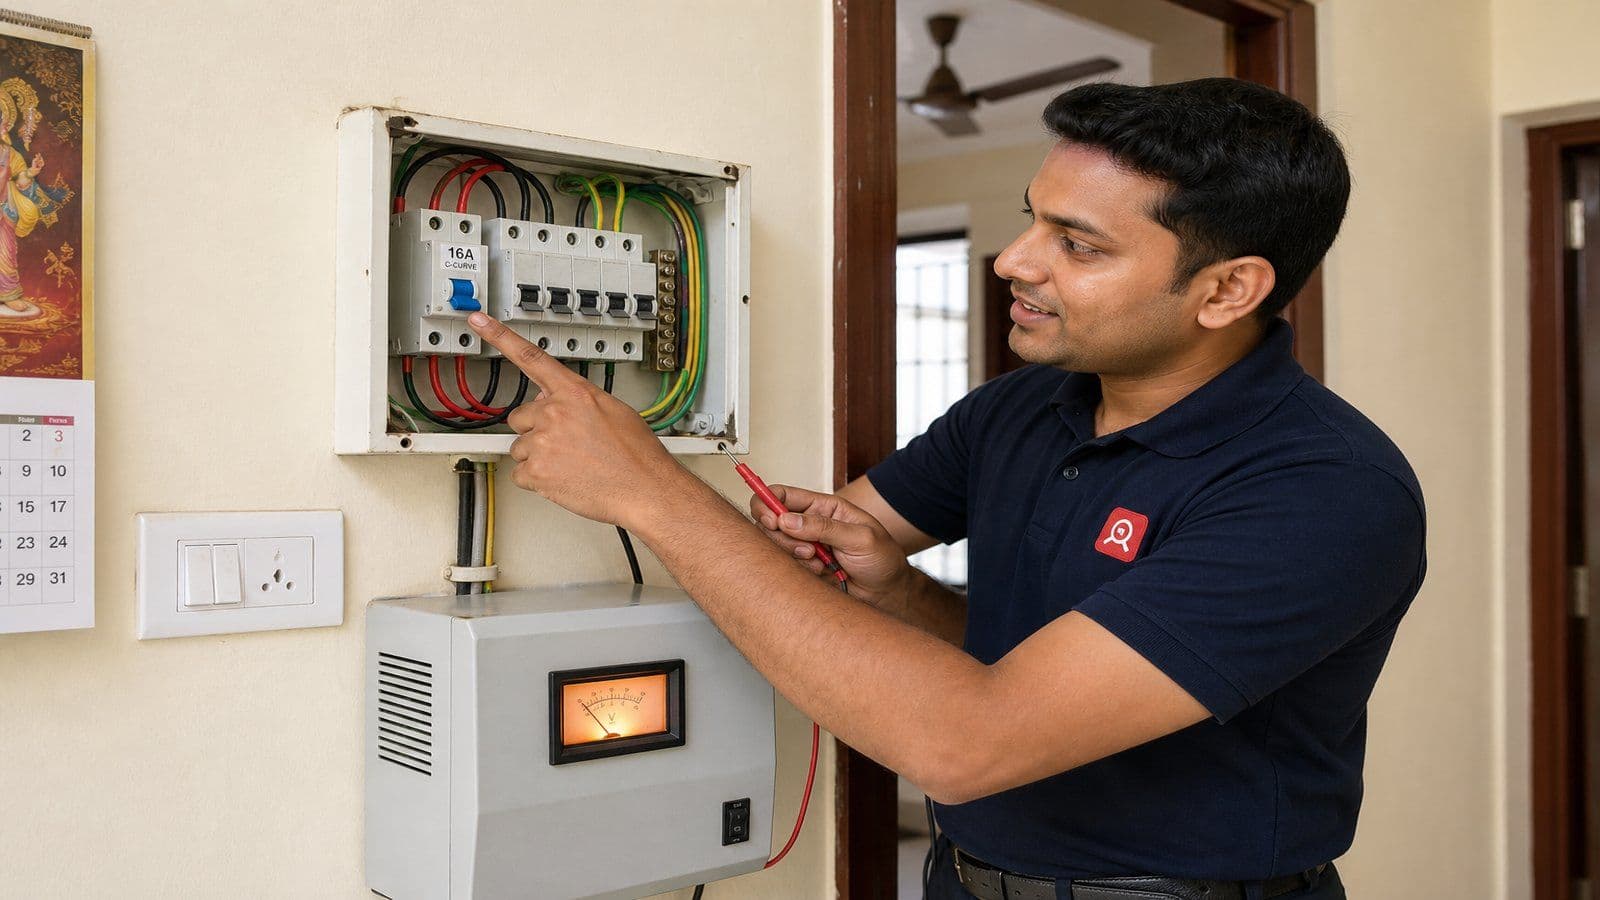
Photo: Dedicated 16A C-Curve MCB and Stabiliser for Window AC
Step 6: Chassis Sliding, Foam Gasket and the Lock Screws
With the sleeve mounted, tilted, sealed and wired, the chassis goes in. Slide it fully until it bottoms out against the rear stop. Most brands have internal runners; ensure both sides engage cleanly. A chassis that goes in cocked will not seat properly, will vibrate, and will trap unsealed gaps along one side.
The foam gasket around the front of the chassis compresses by 30 to 50 percent when fully seated, creating an indoor air seal against the sleeve. If the gasket is damaged, replace it before fitting; a missing gasket lets humid outdoor air leak into the room and forces the AC to work much harder.
The lock screws on the front fix the chassis permanently into the sleeve. Drive all four, torque to brand spec, and leave a 3 to 5mm grease film on the threads so they can be removed for service without rounding the heads.
Step 7: Commissioning Test, Cooling Check and Vibration Check
Never call the install complete without a commissioning test. The point of commissioning is to optimise every variable the installer can still adjust before handover, because every rework visit later costs both sides time and money. Switch on at the MCB, start the AC at the remote. Set to 22 degrees, full fan speed, cool mode.
Run for 15 minutes uninterrupted.
The outdoor section should hum steadily, not rattle. The indoor blower should run smoothly without bearing whine. Supply air temperature at the front louvres should drop 12 to 15 degrees below room temperature within 10 minutes; less than 8 degrees indicates a refrigerant or airflow problem.
Condensate should drain visibly from the rear spout within 8 to 12 minutes. The chassis should sit firm; if you can rock it with one hand, re-torque the lock screws or sleeve anchors.
Pour 250ml of clean water into the chassis drain pan through the front filter. All of it should run out of the rear drain spout within two minutes. If any pools inside or tracks back towards the indoor face, the rear tilt is insufficient and must be re-shimmed before handover.
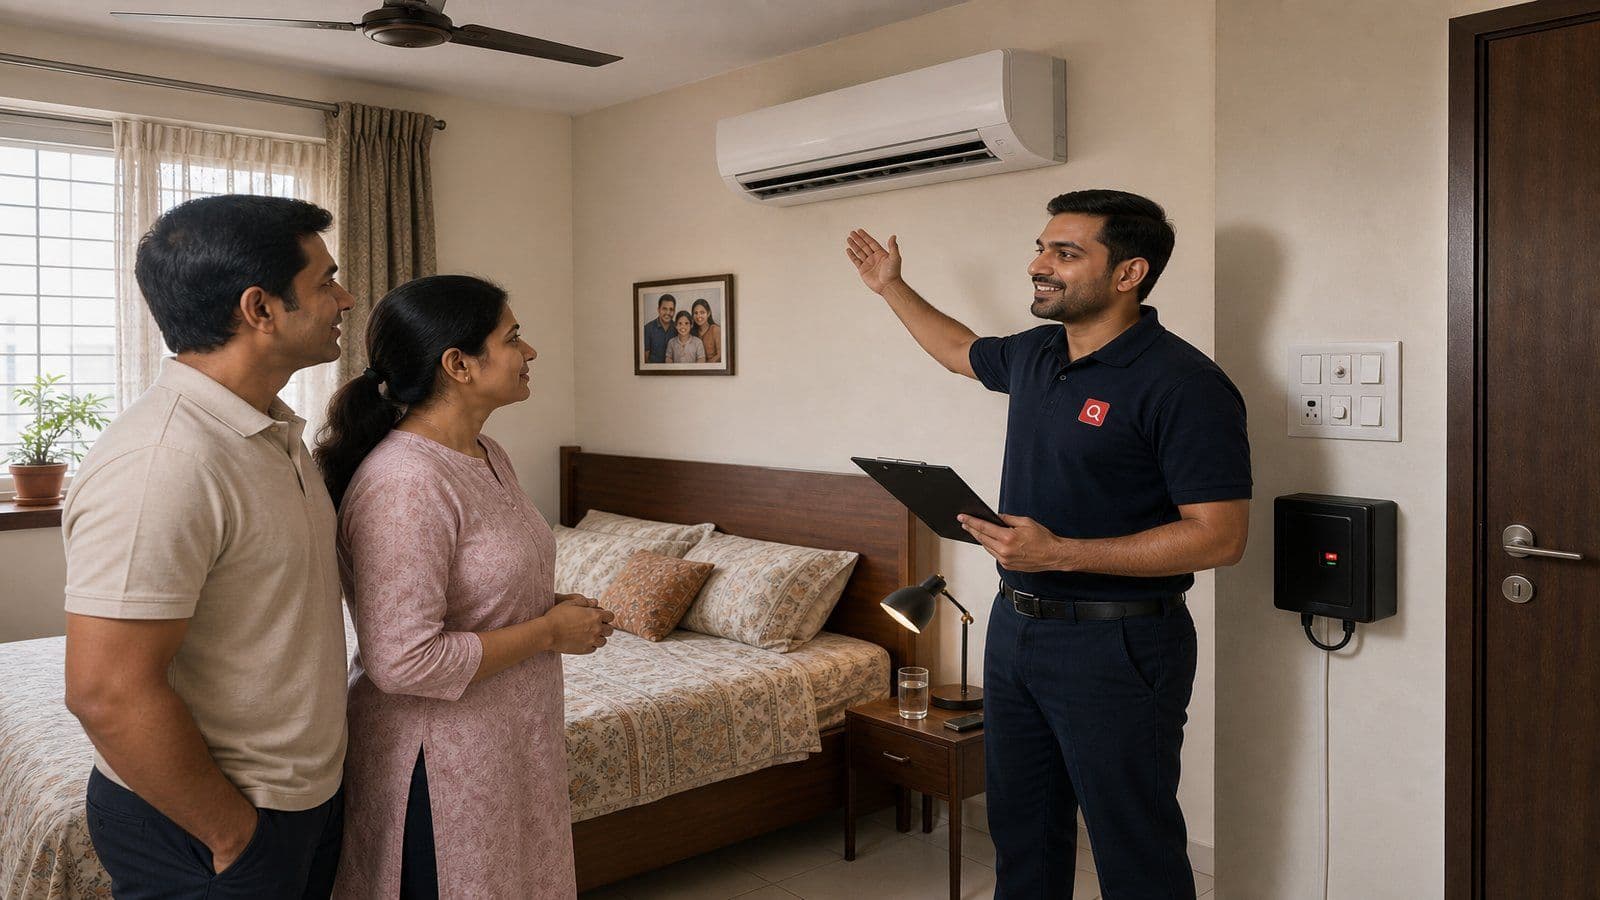
In Bandra and Colaba where the monsoon load is brutal, I will not sign off a window AC until I have seen 250 millilitres drain cleanly out of the rear spout in under two minutes.
The colour of that water as it exits also tells me whether the drain pan was clean at fitting; cloudy water means manufacturing residue is still inside and the chassis needs a flush before handover."
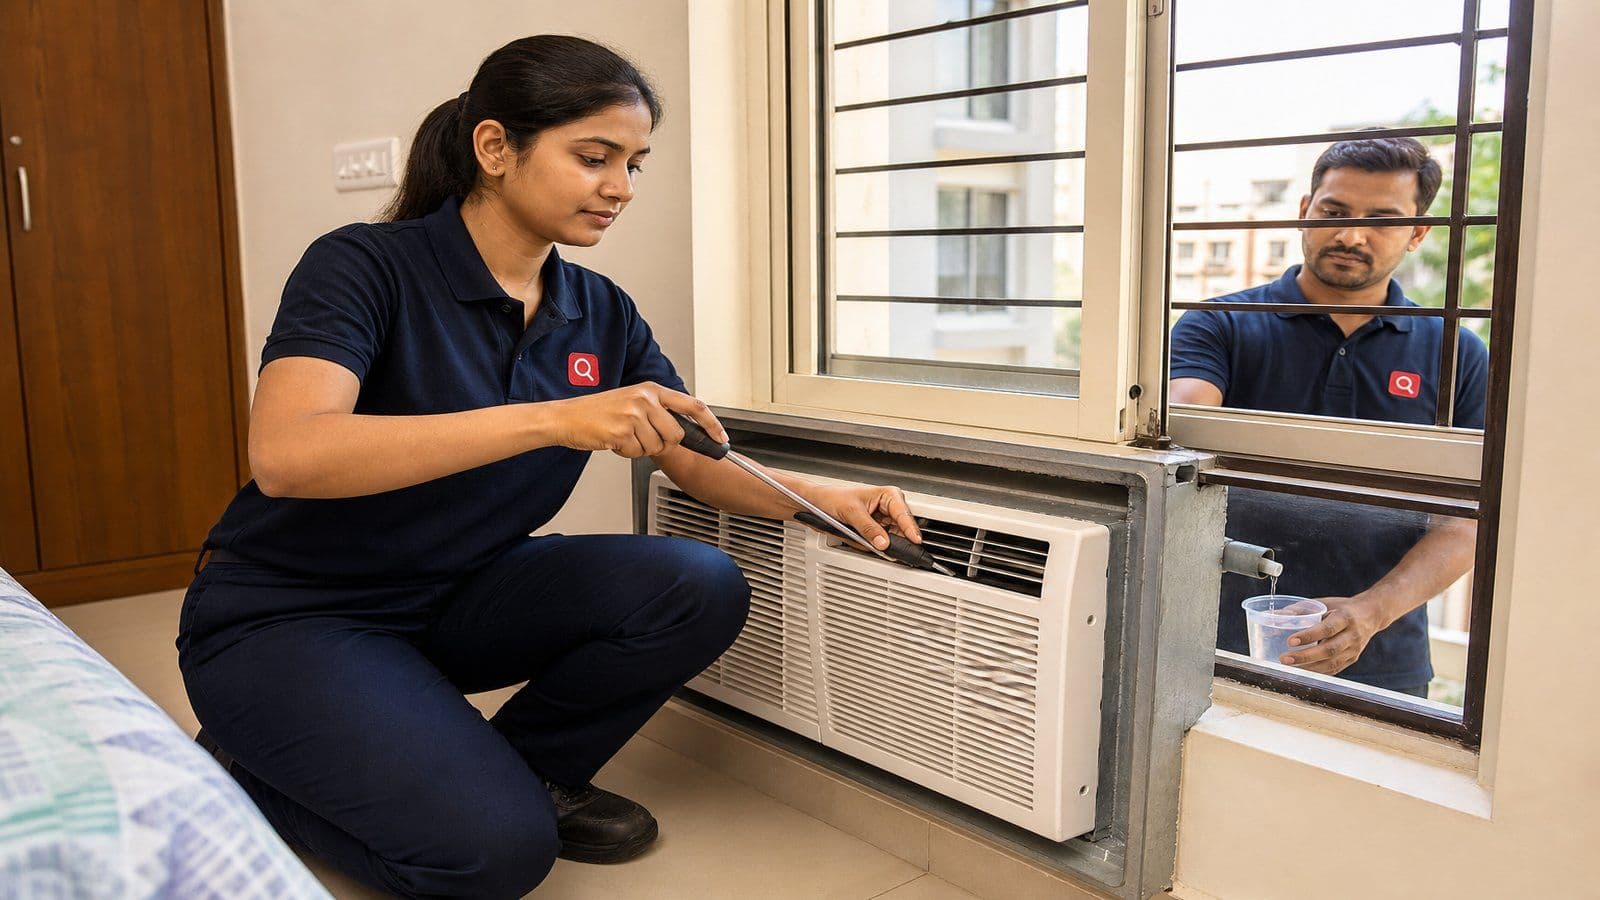
Photo: Pour Water Test Confirming Rear Tilt and Drain Function
The pour-water test takes 90 seconds and it is the only test that catches a sub-millimetre tilt error before the first monsoon does. I tell every customer to insist on watching it. If the installer skips it or says it is not needed, that is the single biggest red flag in the entire install.
Common Mistakes Indian Installers Make
Six errors account for nearly all rework calls our ProNearMe network handles on window AC installs.
Dead-Level Installation
Unit goes in level instead of tilted 10 to 15mm rear-down. Water tracks inwards in the first monsoon. Always test with poured water at commissioning.
Undersized Sleeve
A 1.5 ton chassis squeezed into a 1 ton sleeve. The chassis does not fully seat, the foam gasket cannot compress, the unit rattles. Confirm sleeve internal dimensions before ordering.
Missing Drip Cap
Sleeve is sealed correctly but no drip cap above. First monsoon sheets water down the wall onto the silicone bead and it fails by capillary action within two seasons.
Get quotes from verified, top-rated AC Service & Repair pros in Delhi.
Shared Electrical Circuit
The 16 amp MCB is shared with a kitchen geyser, microwave or borewell pump. The first time both loads call together, the MCB trips. Move to a dedicated circuit at the planning stage, not after the first trip.
B-Curve MCB Used Instead of C-Curve
MCB trips on every compressor start-up. Customer thinks the AC has a fault. Swap to C-curve resolves immediately. Specify C-curve at planning; explain to the electrician if needed.
Plastic Wall Plugs Instead of Masonry Expansion Anchors
Sleeve loosens over 18 to 24 months under compressor vibration, chassis sags, water finds new paths into the room. Insist on minimum 10mm zinc-plated expansion anchors.
When I train new technicians joining our ProNearMe network in Pune and Hyderabad, I tell them 80 percent of window AC service callbacks in the first year are not the AC's fault, they are install faults. What goes wrong is the sleeve, the tilt, the silicone, the MCB curve, the earth continuity. Treat the install as the precision job it actually is and the same window AC will run for 11 to 13 years without a single service call beyond annual cleaning.
2026 Cost Benchmarks for Window AC Installation
Costs vary by city, by sleeve material, by whether the wall opening is ready or needs cutting, and by access difficulty (ground floor versus fifth floor without lift).
The figures below are typical residential ranges across major Indian cities in mid-2026, exclusive of 18 percent GST, on a standard 1.5 ton window AC into a pre-existing window opening that needs only minor adjustment.
| Cost Component | Tier 1 City Range (₹) | Tier 2 City Range (₹) |
| Labour, standard install | 2,200 to 3,800 | 1,400 to 2,400 |
| GI sleeve, 1.5 ton size | 1,600 to 2,800 | 1,200 to 2,200 |
| Masonry expansion anchors and hardware | 250 to 450 | 200 to 350 |
| Neutral-cure silicone (1 tube) | 280 to 450 | 220 to 380 |
| Drip cap, GI 50mm projection | 350 to 600 | 280 to 480 |
| 16 amp C-curve MCB | 220 to 380 | 180 to 320 |
| 2.5mm² copper cable, per metre | 95 to 140 | 80 to 120 |
| 4 kVA voltage stabiliser | 2,400 to 4,200 | 2,000 to 3,500 |
| Wall opening modification, if needed | 1,200 to 3,500 | 800 to 2,500 |
| Total typical install, ready opening | 7,500 to 12,500 | 5,800 to 9,500 |
For the deeper cost picture across all AC types and including split installs, see AC installation cost breakdown India 2026.
Tier 1 Versus Tier 2 Installer Rate Differences
A 1.5 ton window AC install through a vetted technician costs 40 to 60 percent more in Mumbai, Delhi NCR, Bengaluru, Chennai and Pune than the same job in Indore, Coimbatore, Lucknow or Bhubaneswar. The gap is almost entirely labour, not parts.
Three drivers explain most of it. Urban technician wages have risen 8 to 12 percent year on year since 2022. Metro installs more often involve high-floor access, parapet work, scaffold rental and society approval coordination.
The metro market has consolidated around platform-vetted technicians who charge a brand premium, while tier 2 markets still have a deep pool of independent installers competing on price. The bill of materials (sleeve, MCB, silicone) costs roughly the same in Indore as in Mumbai.
A tier 2 customer paying fair part prices should expect a total install bill 30 to 40 percent under the metro figure for the same scope.
Case Study from a Misdiagnosed Window AC Install in Faridabad
Mrs. Anjali Saxena, a customer in Sector 21 Faridabad, called our ProNearMe team in July 2025 about a new 1.5 ton window AC installed in May. Water was dripping from inside the unit onto her bedroom floor, heavy in the first week of monsoon. The original installer had already visited twice, re-sealed the silicone, and told her the AC was faulty.
The brand service team inspected the unit, found no internal fault, and refused to replace it.
Our ProNearMe technician arrived, ran the pour-water test, and immediately identified the issue. The chassis was sitting almost dead-level, with only 3mm of rear drop instead of the required 10 to 15mm.
Condensate was draining about 60 percent of the time outwards in the first hour, but as monsoon humidity rose the condensate rate doubled, the rear spout could not keep up, and water tracked inwards. The fix was to remove the chassis, re-shim the rear of the sleeve by 12mm with thin GI packers, re-bed the silicone joint, and refit.
The pour-water test then drained 250ml in 95 seconds. Total rework cost ₹1,400 inclusive of GST. The unit has run normally through the rest of the 2025 monsoon and the 2026 pre-summer. The original installer had simply skipped step three.
Conclusion
A window AC is a forgiving piece of equipment when installed precisely and a punishing one when installed sloppily. The mechanical chassis, the refrigerant cycle, the PCB and the compressor are built by every major Indian brand to a standard that comfortably supports 10 to 12 years of residential use.
What determines whether the customer actually gets those years, or starts seeing water ingress, MCB trips and vibration cracks inside 18 months, is the seven-step sequence above.
The non-negotiables are the load-bearing wall check, the 10 to 15mm rear tilt, the neutral-cure silicone bead with drip cap and sloped sill, the 16 amp C-curve MCB on a dedicated circuit, and the pour-water commissioning test before handover.
For owners planning a new install in the 2026 summer or the post-monsoon shoulder season, size the unit and confirm the wall first, source a brand-matched GI sleeve before the technician arrives, insist on a dedicated electrical circuit with the correct MCB curve, and refuse to sign off without the pour-water test.
The Press Information Bureau and BEE energy advisories both recommend pre-monsoon installation timing rather than peak-monsoon, because silicone cures faster in dry weather and the install can be tested across the first monsoon while the installer is still under warranty obligation.
Our ProNearMe network data shows installs completed in April or May log 78 percent fewer monsoon-rework callbacks than those completed during July or August.
Disclaimer
All installation cost ranges in this guide are typical residential figures across major Indian cities and exclude GST, currently 18 percent on most AC installation labour and parts in India.
Actual costs vary by city, by sleeve material, by access difficulty (higher floors, parapet work, scaffolding requirement), and by whether the existing wall opening needs structural modification.
We strongly recommend hiring only NSDC-certified or OEM-trained technicians for any window AC installation involving electrical wiring, masonry anchoring or refrigerant work, since these involve regulated safety compliance under CEA and MoEF&CC rules.
ProNearMe does not endorse any specific AC brand and the installation methodology in this guide applies across all residential window AC manufacturers selling in India.
Sources & References
- Bureau of Energy Efficiency Air Conditioner Standards and Labelling Programme
- Bureau of Indian Standards IS 1391 Room Air Conditioner Performance Standard
- Ministry of Environment, Forest and Climate Change Ozone Cell and Kigali Amendment Implementation
- National Skill Development Corporation HVAC Technician Qualification Pack
- Indian Society of Heating, Refrigerating and Air Conditioning Engineers Residential HVAC Guidelines
- Press Information Bureau Advisory on Energy Efficient Air Conditioning Practices
- Central Electricity Authority Wiring and Safety Regulations for Domestic Installations
- National Building Code of India 2016 Part 8 Building Services
- Ministry of Power Energy Conservation Building Code Residential
- Indian Plumbing Association Condensate Drain and HVAC Guidelines
Amit worked as an AC technician for 6 years in Ahmedabad before transitioning to technical writing. He holds a diploma in Refrigeration and Air Conditioning from ITI Ahmedabad and understands the difference between what AC companies promise and what actually happens on the ground. His articles break down complex technical topics into plain language that any homeowner can follow. He tests every tip he writes about in his own home first.