- A standard split AC installation in an Indian apartment takes 3 to 4 hours of clean work Anything finished in under two hours has skipped at least one step that will cost you later, and anything pushed past five hours usually means the site survey was missed or the society approval was incomplete.
- BIS standard IS 1391, the BEE star rating framework, and the NBC 2016 Part 8 building services code together set the legitimate baseline for residential AC installation in India. A NSDC Mechanic-RAC certified installer working to these references is the minimum competence bar.
- The 2026 installation cost for a 1.5 ton split AC in an Indian metro runs ₹2,800 to ₹6,500 for standard installation, with copper piping, bracket, drainage, and an MCB upgrade adding ₹1,500 to ₹8,000 depending on distance and complexity. Anyone quoting "all-inclusive ₹1,500" is cutting corners on materials.
- A dedicated 16A or 20A MCB on its own circuit is non-negotiable for any AC above 1.0 ton Sharing an AC with other appliances on a 6A or 10A circuit is the single most common installation shortcut and the most expensive one over the life of the unit.
- Outdoor unit placement decides monsoon survival A unit mounted on the south or west wall with full afternoon sun, no rain shield, and a low ground clearance will fail two to four years before the same unit on a shaded north or east wall with proper drainage clearance.
This ac setup guide India 2026 walks through every stage of a proper ac installation, because the install crew you pick on day one is the single biggest predictor of how your new air conditioner will perform over the next decade. The unit you bought matters, the brand matters, the BEE star rating matters, but none of it matters more than the four hours your installation crew spends on day one.
Get the install right and a mid-tier 3-star AC will out-cool and out-last a poorly installed 5-star inverter. Get the install wrong and the most expensive Japanese-tech unit will limp through summers and die at year six.
This guide is the master reference for everything an Indian homeowner needs to plan, approve, and verify a residential AC installation in 2026. It walks through the choice between split, window, and cassette formats, the electrical load and MCB sizing checks that must happen before any drilling starts, the society and RWA approval reality across Indian metros, copper pipe and bracket specifications that separate a professional install from a cowboy job, monsoon-readiness rules for outdoor unit placement, the day-of installation checklist that catches problems while the crew is still on site, and a full cost breakdown for 2026 with the line items you should expect and the ones you should refuse.
Across 14 years and more than 2,800 service calls in Mumbai, Pune and Hyderabad, I have come to the same conclusion every time. Roughly half the AC service problems I am called for in years three to seven of a unit's life trace back to installation shortcuts in the first four hours. This guide is built to prevent that.

Get quotes from verified, top-rated AC Service & Repair pros in Delhi.
How a Modern AC Installation Actually Works
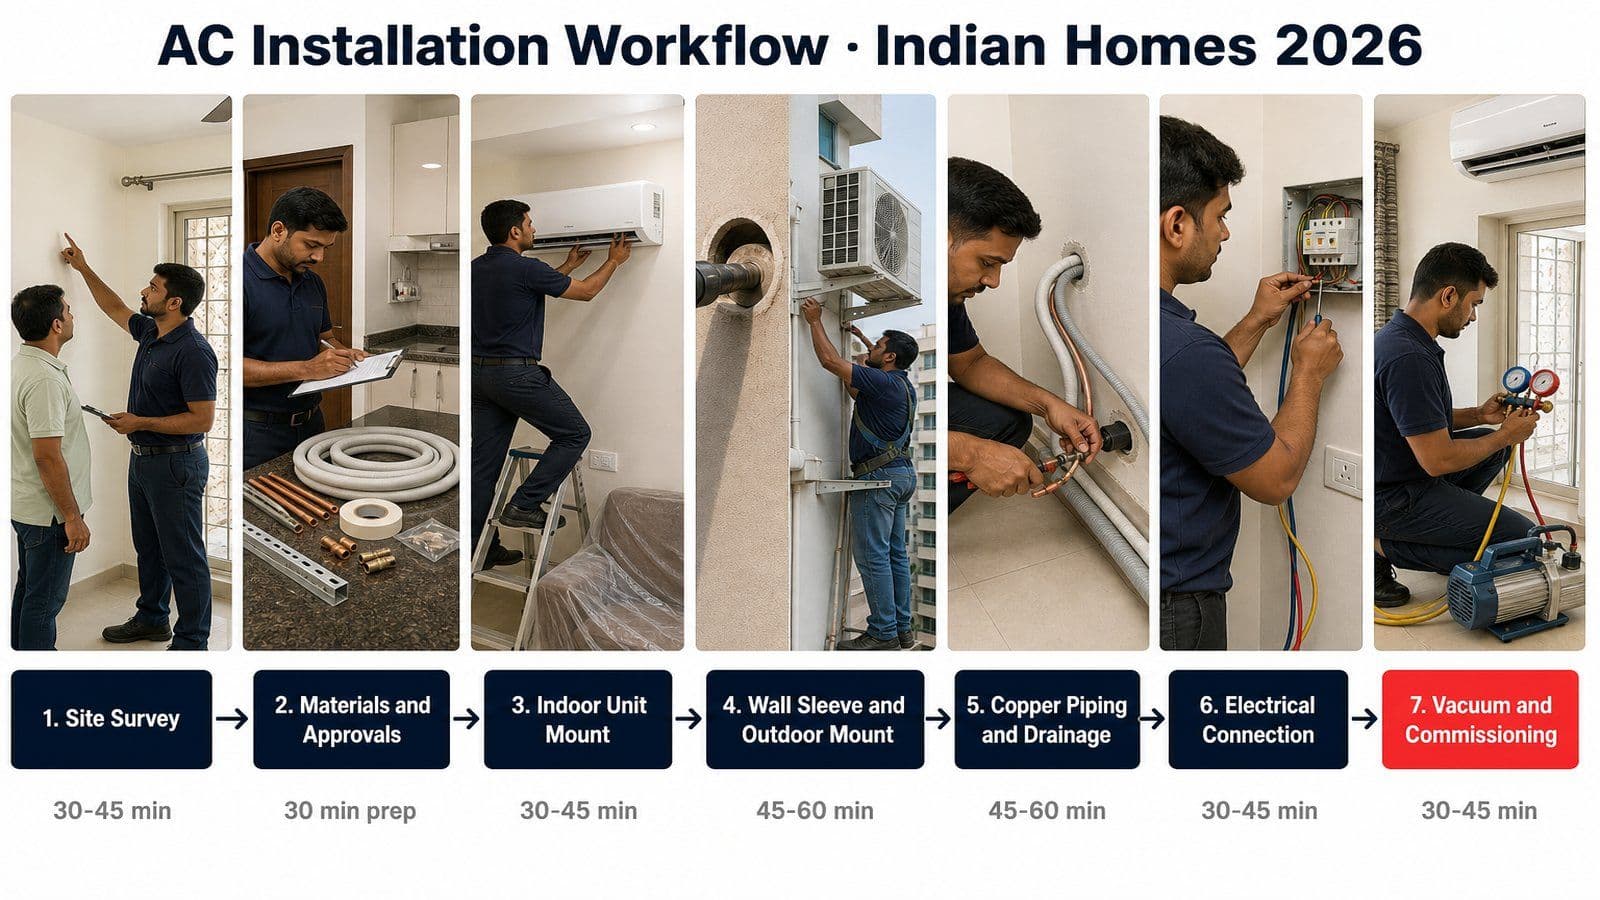
Photo: Seven-stage AC installation flow
A residential AC installation in India in 2026 follows a seven-stage workflow that any serious installer will follow on every job. Owners who know these stages can verify the work in real time. Owners who do not, sign off on installations that look complete but have skipped the steps that matter for long-term reliability.
Stage one is the site survey. A pre-installation site visit should happen before the AC is delivered, ideally during purchase decision. The installer measures the indoor wall, identifies the outdoor unit position, checks the electrical panel, confirms drainage routing, and notes any society restrictions on outdoor placement. In urban India this stage is increasingly skipped because of aggregator-platform pricing pressure. The result shows up later as installations that need a second visit and additional materials.
Stage two is materials and approvals. The installer prepares copper piping (usually 3 to 5 metres standard), drainage piping, the outdoor bracket, anchor bolts, the wall sleeve, electrical cable, and the MCB if a circuit upgrade is needed. Society approval paperwork is collected if your housing association requires it.
Stage three is the indoor unit mount. The wall-mounting plate is fixed to the indoor wall using anchor bolts (never just rawl plugs into plaster), with a 3-degree tilt toward the drain side so condensate flows naturally outward. A spirit level check at this stage prevents future water dripping from the front of the unit.
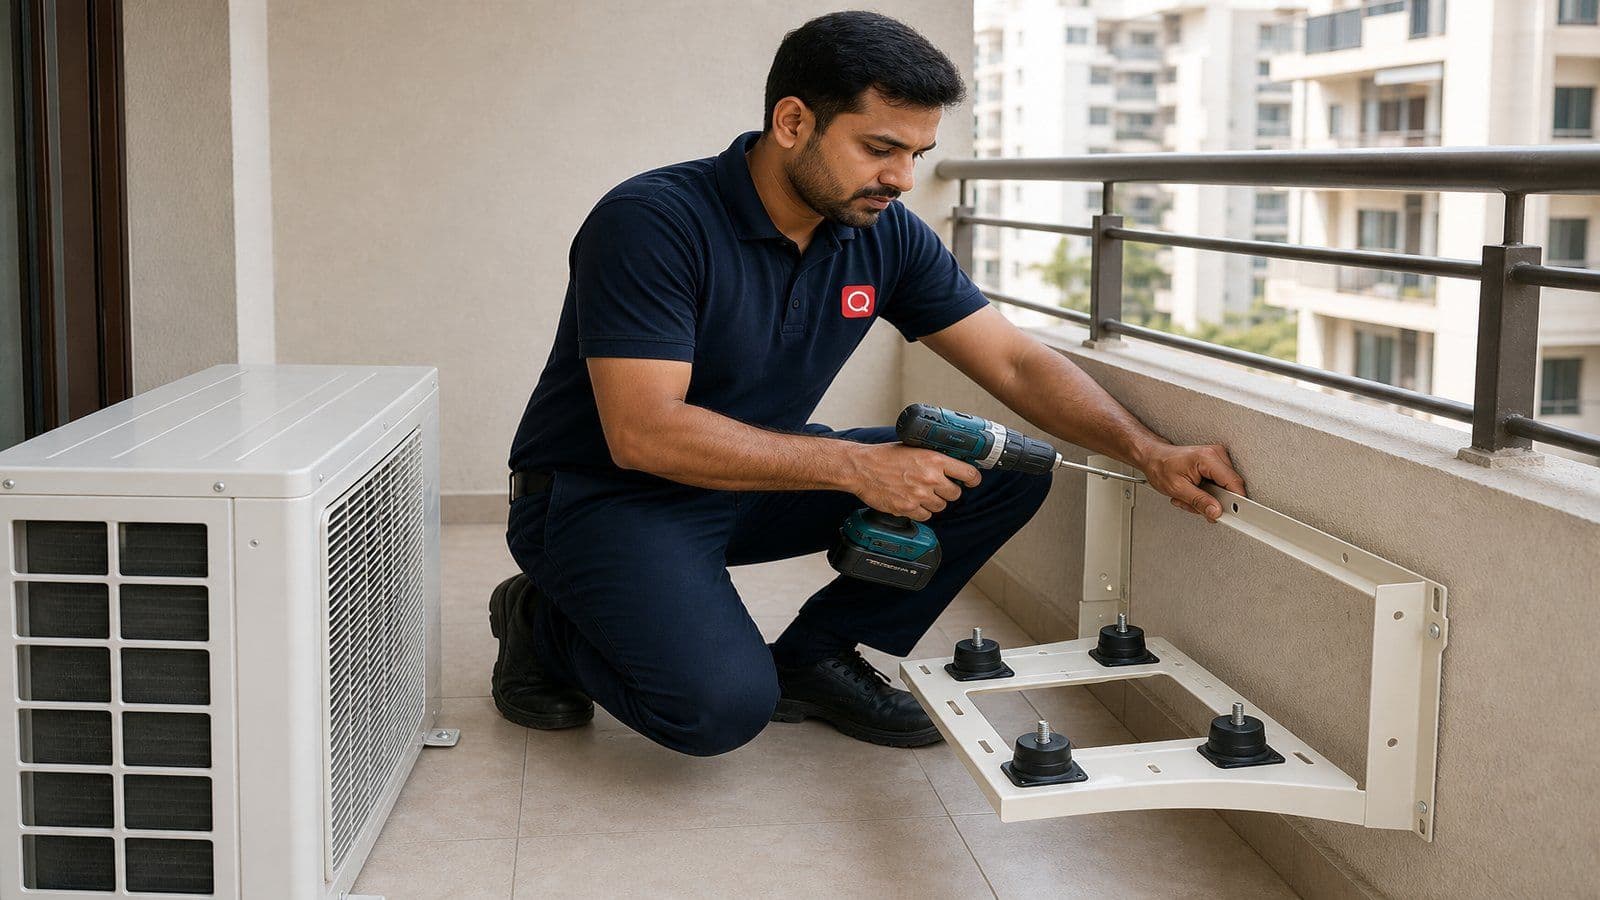
Stage four is the wall sleeve and outdoor unit placement. A core drill cuts a sleeve through the exterior wall sized for the copper pipe bundle plus the drainage pipe. The outdoor unit is mounted on its bracket (or a concrete pad in ground-floor installations) with vibration dampening pads and clearance for airflow on all four sides per the unit's specification.
Stage five is copper piping and drainage. The copper pipes are routed from indoor to outdoor with the correct insulation, flared at both ends to the specification of the unit, and connected with a torque wrench at the recommended Newton-metre value. The drainage pipe is connected and routed downward all the way to discharge, with no upward kinks that would create water-traps.
Stage six is the electrical connection. The dedicated MCB is installed (or the existing one verified for correct rating), the power cable is run from the MCB to the outdoor unit's terminal block, the indoor unit's signal cable is connected, and the entire circuit is checked for continuity and earthing.
Stage seven is the vacuum, gas release, and commissioning. The connected refrigerant lines are vacuumed to remove air and moisture using a manifold gauge and vacuum pump, the outdoor unit's pre-charged gas is released into the system using an Allen key on the service valves, the unit is powered on, and the installer runs a full functional test including cooling output, drainage flow, voltage stability, and remote pairing.
A complete seven-stage installation done well takes 3 to 4 hours for a single split AC in a standard urban apartment. Sites with longer pipe runs, multiple ACs being installed on the same visit, or first-time society approval paperwork can push the total to 5 to 6 hours. Sites that finish in under two hours have almost certainly skipped the vacuum or the torque-wrench step, both of which directly determine whether the unit will hold its refrigerant charge past year three.
I tell every new owner the same line on day one: stand near your installer and watch stage seven. The vacuum pump must run for at least 15 minutes on a standard install and longer if the pipe run is over five metres. If you do not see the pump running, you have not seen the installation finished, and that AC will lose gas within 18 months.

Choosing the Right AC Format for Your Home
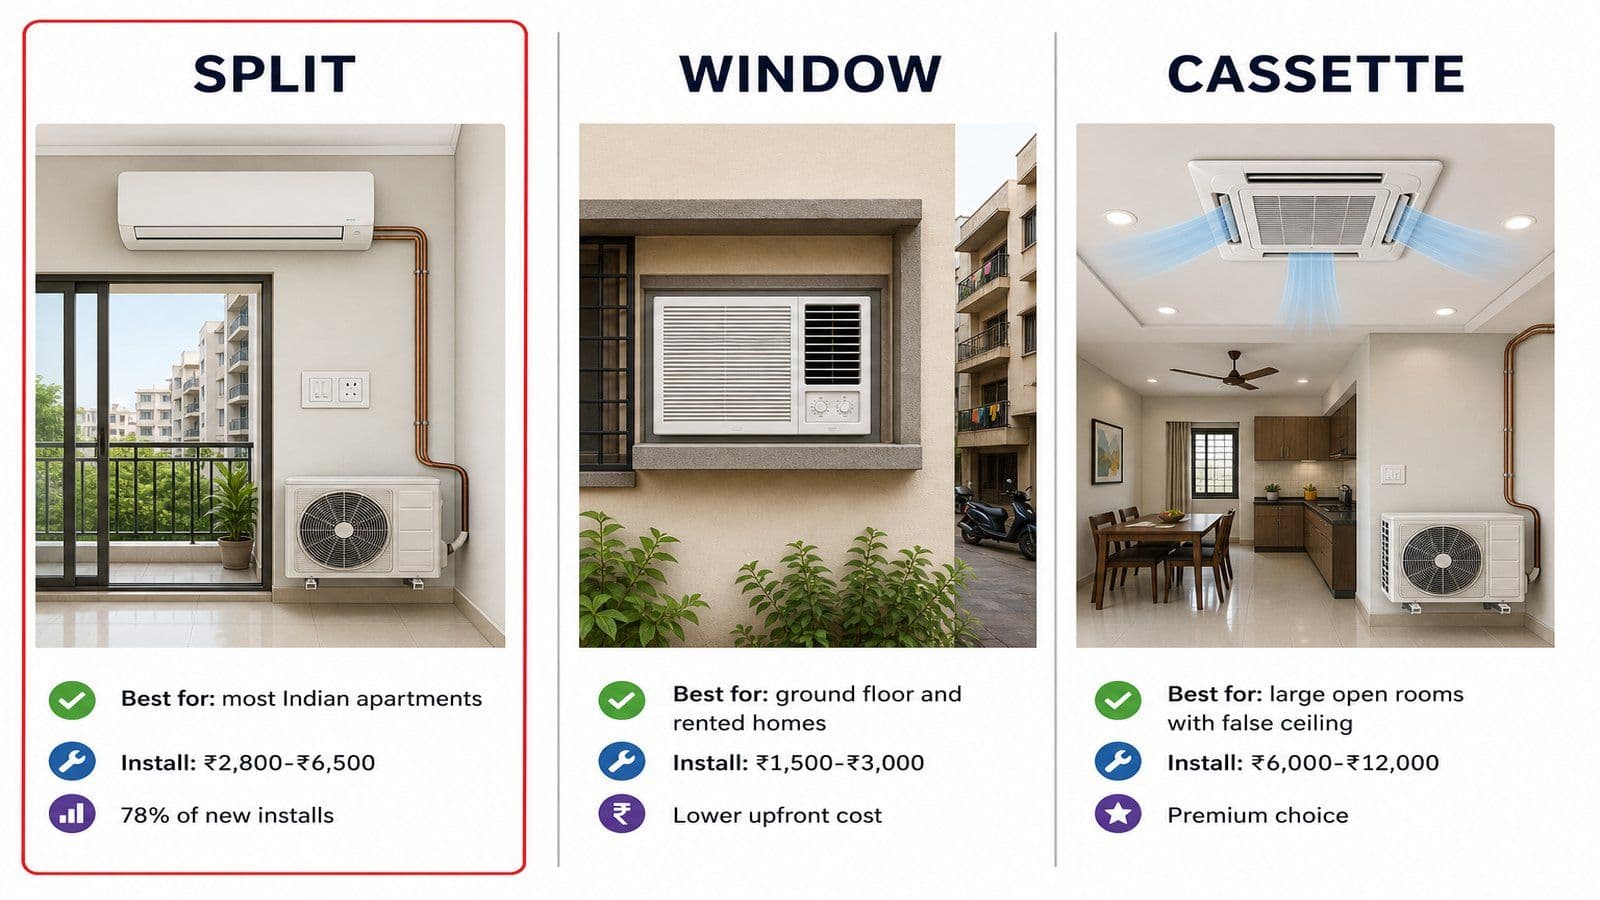
Photo: Split window and cassette AC format comparison
Before any installation conversation, you need to lock the AC format. The three residential formats sold in India in 2026 are split, window, and cassette. Each suits a different home type, and the installation work for each is genuinely different.
Split AC
The wall-mounted split with a separate outdoor unit is the default for most Indian apartments in 2026. Roughly 78 percent of new residential AC installations in metros are splits, per the most recent industry data published through ISHRAE channels. The format works because the noisy compressor sits outside the living space, the indoor unit can be mounted high on a wall to deliver cooling efficiently, and the form factor suits modern Indian apartment layouts where outdoor balconies or exterior walls are available for the outdoor unit.
Splits are slightly more demanding to install than windows. Copper pipe routing, wall sleeve drilling, and outdoor bracket mounting all need a competent installer. A poor split installation shows up within two to three years as refrigerant leaks, drainage dripping, or vibration noise from the outdoor bracket.
For the detailed step-by-step on split installation, see our split AC installation step-by-step guide.
Window AC
Window units are a single-box format that fits into a rectangular cut-out in an exterior wall or window. They were the default Indian residential AC for decades and still suit specific Indian homes: ground-floor units with a window facing an open compound, older buildings where exterior wall drilling for split bracket is structurally not advised, rented homes where the owner does not want a permanent outdoor unit fixture, or single-room cooling at the lowest installed cost. A standard 1.5 ton window AC installation runs ₹1,500 to ₹3,000 including the wooden frame and the sealing work, well below split installation cost.
The trade-off is that window units occupy a window opening, are noisier indoors because the compressor sits inside the same chassis, and have a smaller selection of high-efficiency models in 2026 because most brands have moved their inverter technology investment to splits.
For the dedicated window-specific installation workflow, see our window AC installation step-by-step guide.
Cassette AC
Ceiling-mounted cassette ACs (the four-way airflow flat ceiling unit familiar from offices) are increasingly chosen for large open-plan Indian living rooms in newer apartments. Installation requires a false ceiling capable of supporting the unit weight (typically 18 to 28 kilograms for residential capacities), professional electrical and drainage routing through the ceiling void, and a copper pipe run that may need to traverse the entire flat to the outdoor unit. Installation is genuinely more complex and 2026 cost runs ₹6,000 to ₹12,000 over and above the unit price.
Cassettes are not the right choice for most Indian flats. They suit homes with existing false ceilings, large open rooms over 220 square feet, and budgets where the unit price plus installation reaches ₹95,000 plus. For most other situations the equivalent split AC delivers similar cooling at half the total cost.
Pre-Installation Electrical Load and MCB Sizing
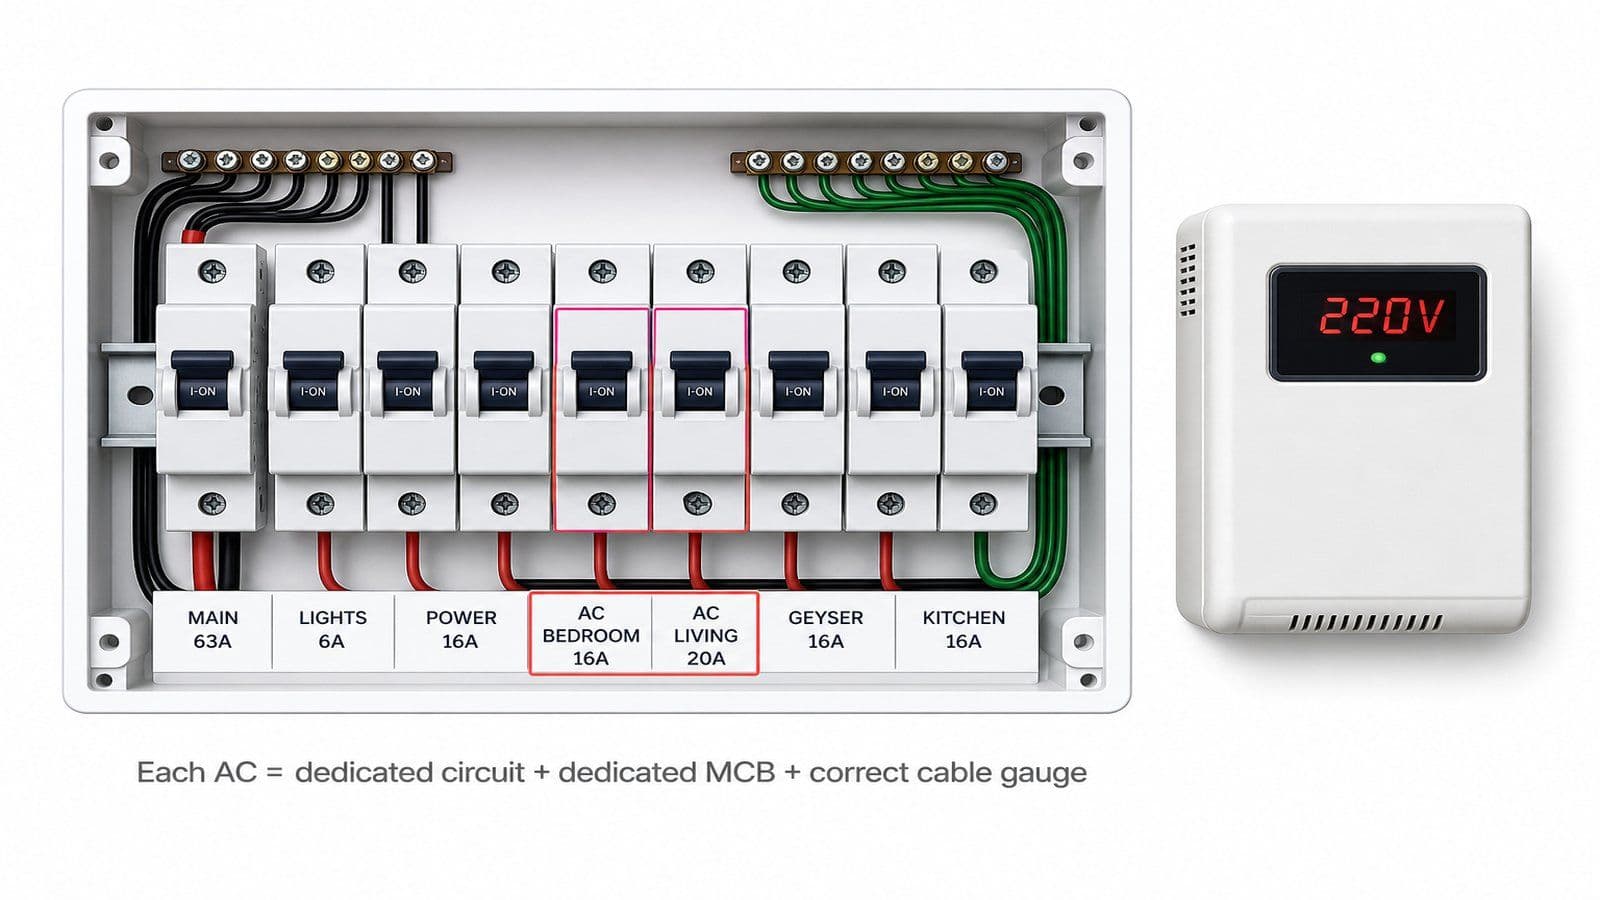
Photo: Indian MCB board with dedicated AC circuit
This is the single most important pre-installation check in any Indian home and the one most aggressively cut by budget installers. A dedicated MCB of the correct rating on its own circuit is what separates an AC that runs reliably for ten years from one that trips repeatedly and damages itself.
The rating to use. For a 1.0 ton split or window, a dedicated 16A MCB is the Indian standard practice. For 1.5 ton, also 16A in most cases (some inverter models specify 20A, check the unit nameplate). For 2.0 ton, 20A is standard. For 2.5 ton and above, the dedicated circuit should be 32A and the cable size needs to step up from 2.5 sq mm to 4 sq mm. These are recommendations consistent with NBC 2016 Part 8 building services guidance and the CEA residential electrical practice.
What "dedicated circuit" actually means. The AC is the only appliance on that MCB. No power points on the wall served by that breaker, no light points, no other appliance. The MCB and the cable run directly from the main distribution board to the AC's wall outlet. If your electrician is tapping into an existing room circuit to save cable, the install is non-compliant and you will pay for it later in nuisance tripping or, in the worst case, a winding burnout when voltage sags and the compressor draws compensating current on an undersized circuit.
What to verify before the installer leaves. Open the MCB box and confirm a separate breaker is labelled for the AC, ideally with the AC tonnage written on it. Check the breaker rating on the side of the device matches the AC nameplate requirement. Confirm the cable visible at the MCB output is the correct gauge (2.5 sq mm or 4 sq mm depending on tonnage, single visible diameter approximately 2 to 3 millimetres for the copper conductor).
The voltage stabiliser question. Indian residential voltage commonly drifts between 180V and 250V in many cities, and modern inverter ACs are increasingly built with wide voltage tolerance (typically 145V to 270V). If your unit is a recent inverter from a major brand, check the nameplate for the working voltage range. Many no longer require an external stabiliser. Older designs and basic non-inverter units still benefit from a stabiliser sized at 1.5 times the AC's running wattage. A 1.5 ton AC drawing roughly 1,500 watts uses a 3 kVA stabiliser. Stabilisers run ₹2,500 to ₹6,000 for typical residential capacities.
For the deeper dive on installation cost components including electrical work, see our AC installation cost breakdown India 2026 guide.
Copper Pipe Specifications and Sizing
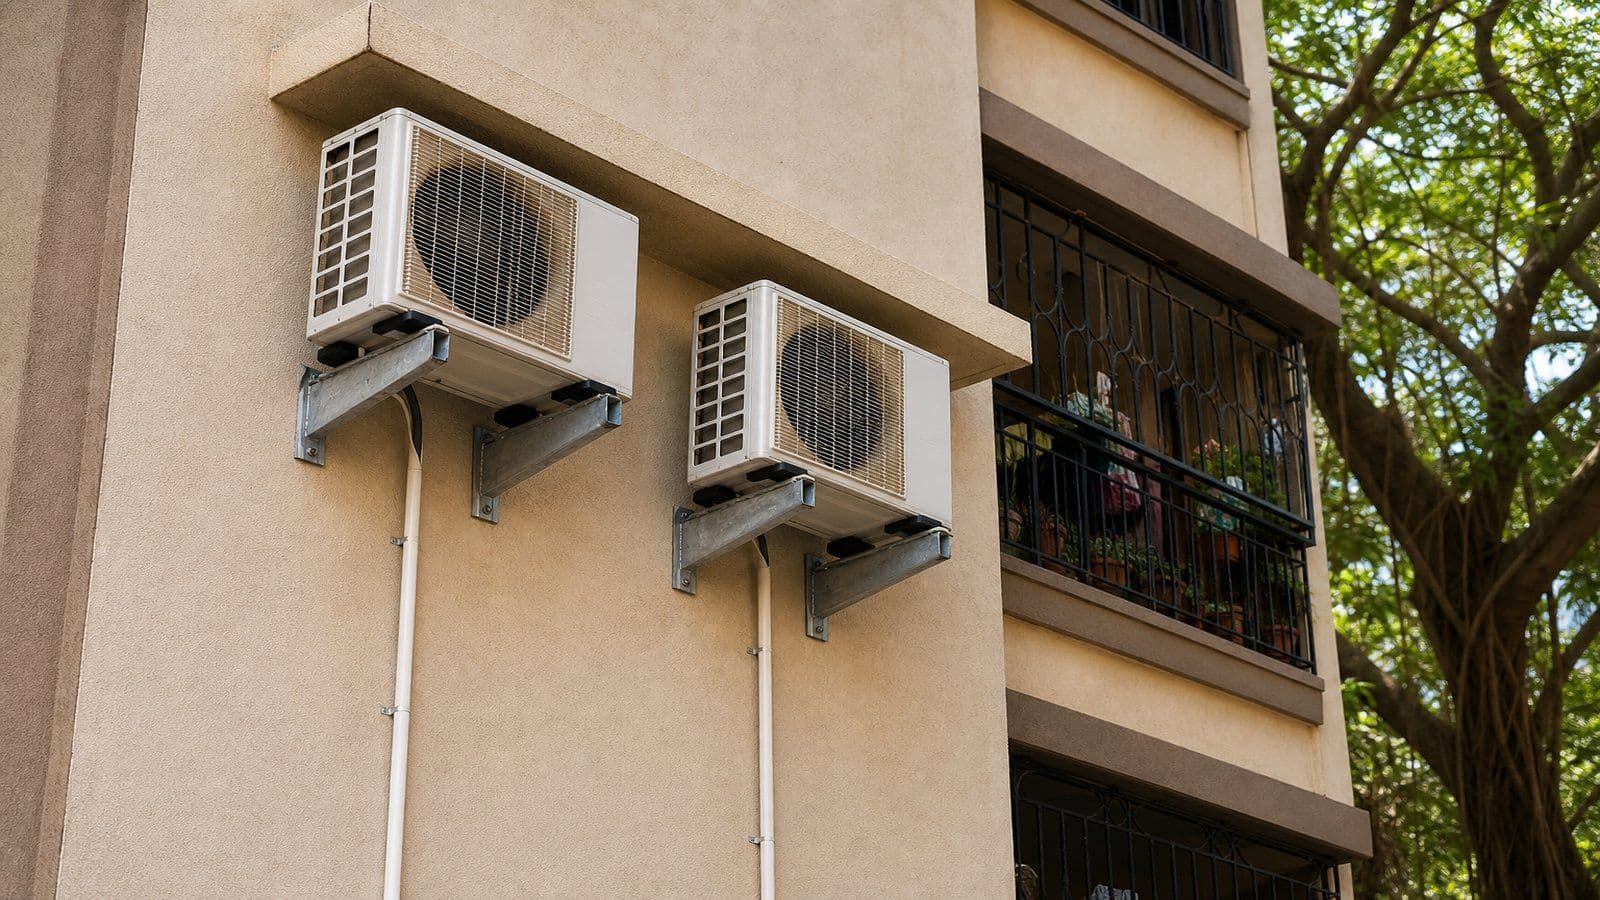
Photo: Outdoor units correctly placed on Indian apartment wall
The copper pipework is the lifeline of a split AC. The two pipes (one liquid, one suction or gas) carry refrigerant between indoor and outdoor units, and the specifications for diameter, thickness, length, and insulation are not optional. This is also the area where unauthorised installers most aggressively substitute cheaper materials.
The standard specification for residential ACs. The pipes are made of refrigeration-grade C12200 copper, the bore sizes are 1/4 inch (6.35mm) for the liquid line and 3/8 inch (9.52mm) or 1/2 inch (12.7mm) for the suction line depending on tonnage, the wall thickness is typically 22 SWG (0.71mm) or thicker, and the insulation is closed-cell elastomeric foam (commonly Armaflex-class) of 9mm to 13mm thickness.
The maximum recommended pipe run for a residential split is typically 15 metres, with the outdoor unit at the same level or below the indoor unit by no more than 5 metres of vertical drop. Longer runs need additional refrigerant charge calculated to the unit specification, an oil trap if the outdoor unit is significantly below the indoor unit, and may require a larger compressor sizing to maintain cooling performance.
What to refuse. Soft "tabletop" copper that flexes under hand pressure, white plastic insulation that is not closed-cell foam, pipe joints made without flaring tools or torque wrenches, and joints made anywhere except at the indoor and outdoor unit connections (intermediate joints leak within years). A good installer flares both ends with a proper flaring tool and uses a torque wrench to the unit's Newton-metre specification at each connection.
What standard installation cost includes. Most installer quotes include the first 3 to 5 metres of copper piping in the base price. Beyond that, expect to pay ₹450 to ₹750 per metre for additional length including the insulation, plus ₹200 to ₹400 per metre of drainage pipe extension. Long pipe runs over 8 metres also require additional refrigerant charge, typically ₹400 to ₹800 per metre for the gas top-up.
For the complete copper pipe sizing reference including the manufacturer-specific charts and the right diameter for each tonnage and run length combination, see our AC copper pipe specifications and sizing guide.
Outdoor Unit Placement Rules
Get quotes from verified, top-rated AC Service & Repair pros in Delhi.
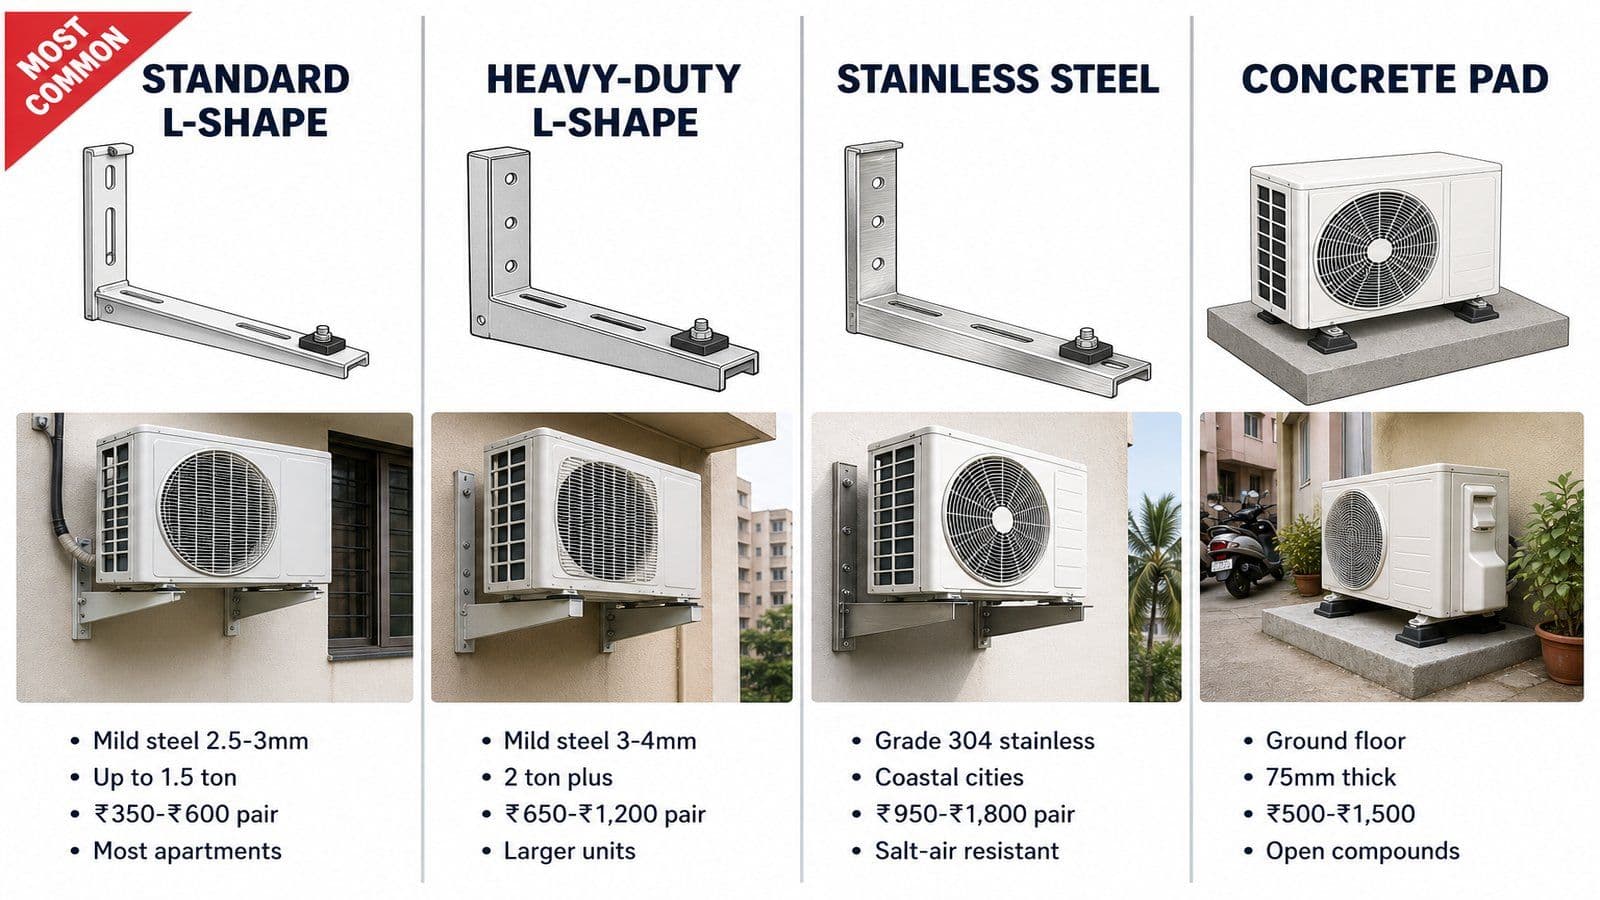
Photo: Four bracket types compared
Outdoor unit placement is the single biggest predictor of how long your AC will last in Indian conditions. The wrong placement turns a 12-year unit into a 6-year unit, and there is almost nothing a service technician can do later to recover the lost life. This is one decision worth getting right on day one.
Six placement rules, in order of importance.
Shade and Sun Exposure
Direct afternoon sun on the outdoor unit raises the condenser surface temperature by 8 to 15 degrees Celsius and forces the compressor to work harder to reject heat. In Indian summers with ambient hitting 42 to 46 degrees, a sun-baked outdoor unit pushes the compressor close to its operational limit daily. North and east-facing walls are the best placement options in most Indian metros. South and west walls need a shade canopy or roof overhang. Avoid placing the outdoor unit directly under a flat concrete roof that radiates afternoon heat back at the unit.
Airflow Clearance on All Sides
The outdoor unit needs free air on all four sides per the unit specification, typically 30 centimetres from the back wall, 60 centimetres in front of the fan discharge, 30 centimetres on the left, 30 centimetres on the right, and 100 centimetres above. Tight installations into utility cupboards or balcony shafts choke the unit's airflow, reduce heat rejection, and shorten compressor life dramatically.
Bracket Strength and Wall Anchoring
The outdoor unit weighs 30 to 55 kilograms depending on tonnage. The bracket must be galvanised mild steel of at least 2.5mm thickness, the anchor bolts must penetrate at least 75mm into solid masonry (not into plaster or hollow brick), and the bracket should carry a manufacturer-rated load specification visible on the part. Vibration dampening pads under the unit base prevent the constant compressor vibration from loosening the wall anchors over years.
Ground Clearance for Monsoon
In ground-floor installations and low-mounted balcony positions, the outdoor unit must be at least 30 centimetres above ground level to prevent monsoon water-logging from reaching the unit's electrical compartment. Coastal cities should target 45 centimetres minimum. A small concrete pad or a wall-mounted bracket above flood level is the standard solution.
Drainage Routing Without Water-Trap
The drainage pipe must run downward all the way from indoor unit to its discharge point, with no upward kinks that would create water-traps. A water-trap is the most common cause of indoor leakage in year two onward, as algae and biofilm build up at the kink and slowly block the line.
Avoiding Heat-Source Adjacency
Never place the outdoor unit immediately next to another AC's hot air discharge (common in dense apartment installations where multiple units share a small balcony shaft), next to a kitchen exhaust outlet, or above an enclosed dryer vent. Each of these raises the condenser intake temperature and degrades cooling performance.
For the complete outdoor unit placement workflow including ground floor versus balcony versus rooftop scenarios and the BIS-aligned bracket specifications, see our split AC outdoor unit placement guide.
Bracket Types and Selection
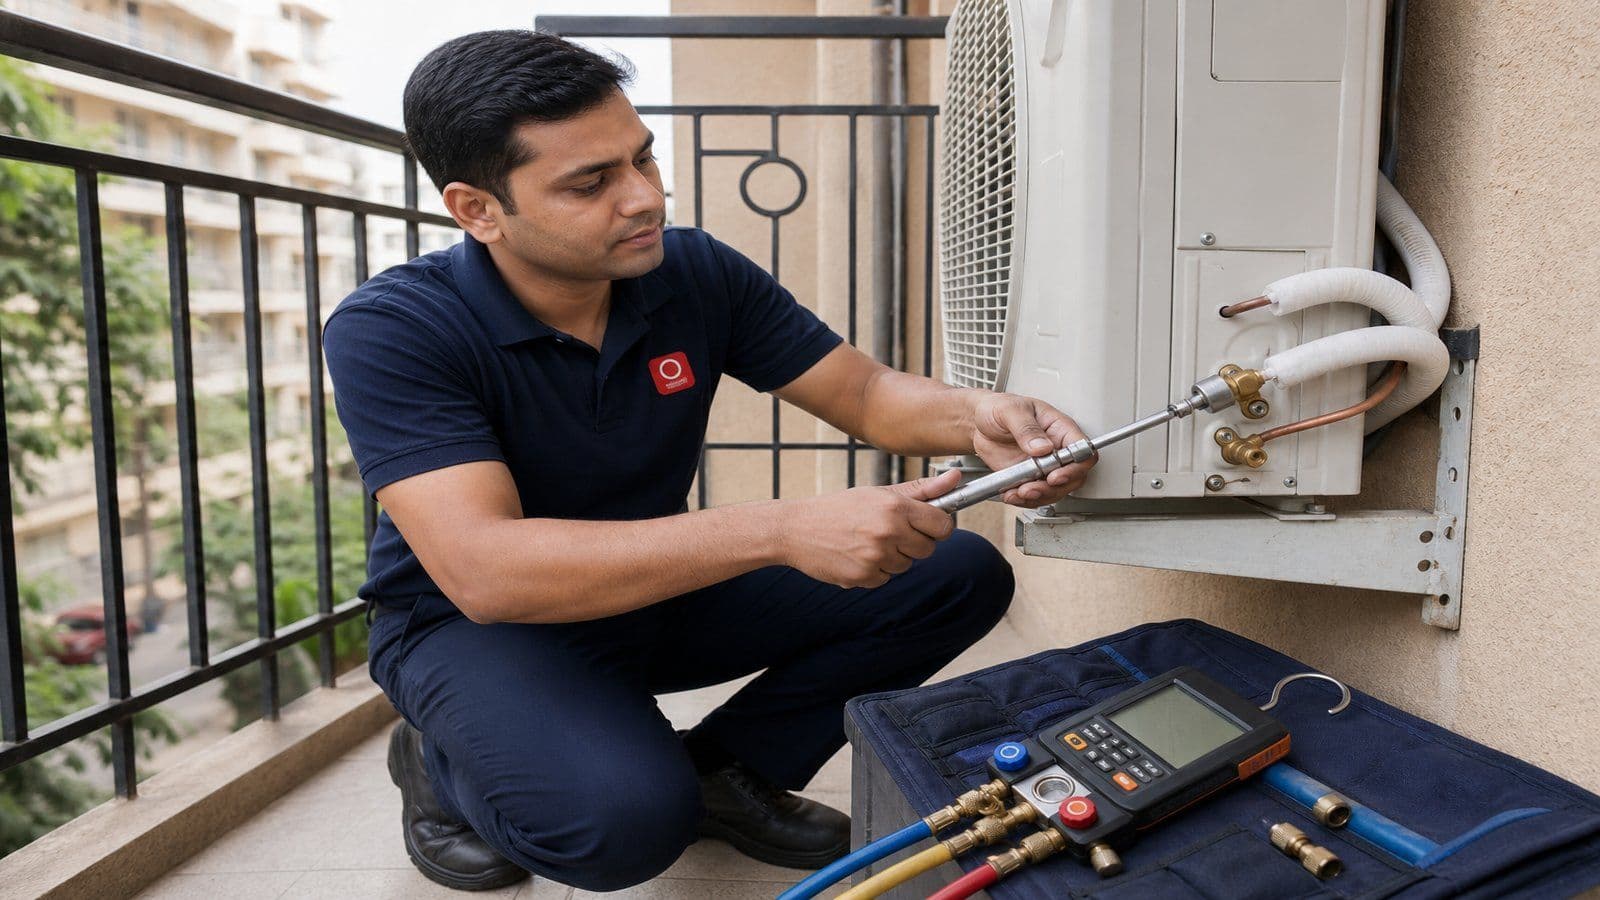
Photo: Installer using torque wrench on copper pipe connection
The bracket that holds your outdoor unit on the wall is one of those parts that owners never think about, and it is also one of the most frequent sources of failure in Indian installations. A cheap bracket that costs ₹400 less can fail in year three from monsoon rust and bring down a ₹35,000 outdoor unit.
The four bracket types in common Indian use.
L-Shape Mild Steel (Standard)
The standard L-shape bracket in 2.5mm to 3mm mild steel with galvanised coating is the workhorse for most apartment installations. Rated for outdoor units up to 1.5 ton typically. Costs ₹350 to ₹600 per pair. The cheaper variants use thinner steel that rusts within two monsoons in coastal climates.
Heavy-Duty L-Shape (2 Ton Plus)
Thicker 3mm to 4mm mild steel L-shape for 2 ton and 2.5 ton outdoor units which weigh significantly more. Rated load typically 80 to 120 kilograms per pair. Costs ₹650 to ₹1,200 per pair. Required for any outdoor unit above 1.5 ton.
Stainless Steel Bracket (Coastal)
Grade 304 stainless steel L-shape brackets for coastal cities (Mumbai, Chennai, Visakhapatnam, Mangalore, Kochi, Thiruvananthapuram, Goa) where airborne salt corrosion will rust standard galvanised steel within three to four monsoons. Costs ₹950 to ₹1,800 per pair. Worth every rupee in coastal homes.
Concrete Pad Mount (Ground Floor)
For ground-floor installations with an open compound, a concrete pad with anti-vibration pads is preferred over a wall bracket. The pad should be 75mm thick minimum, the size should exceed the unit footprint by 50mm on all sides, and the pad should sit on compacted earth or paving. Cost varies by location, typically ₹500 to ₹1,500 for the materials plus labour.
For the complete bracket selection matrix by city, tonnage, and apartment floor, see our AC bracket types and selection guide.
Top Installation Mistakes to Avoid
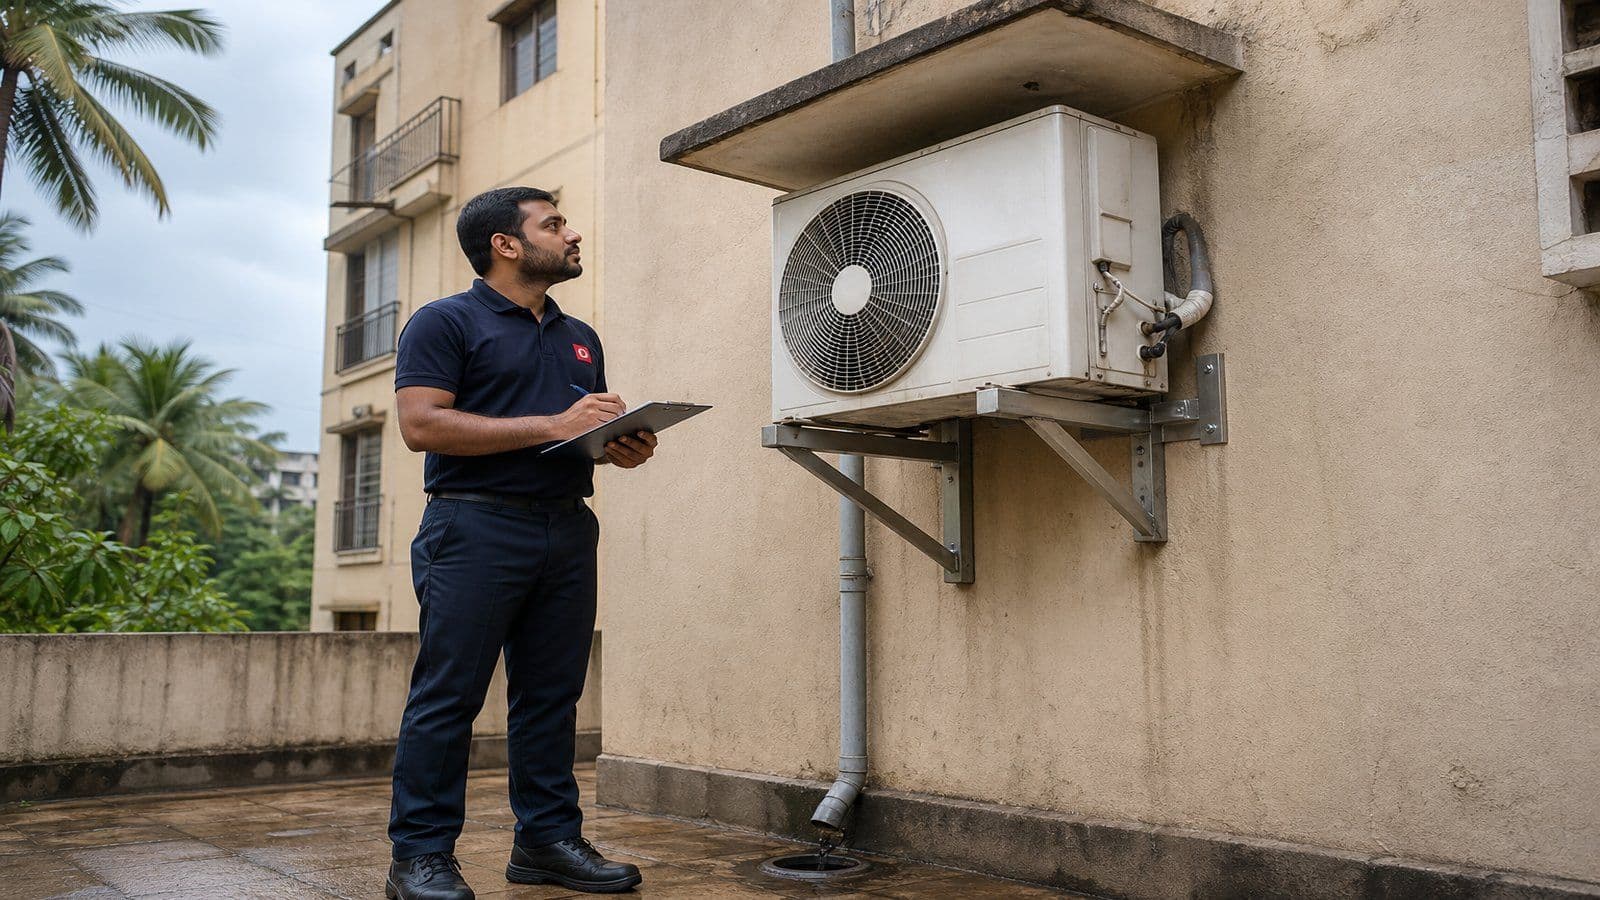
Photo: Outdoor unit on stainless steel bracket above ground level
The same set of installation mistakes show up across the ProNearMe network year after year. Most are caused by installers cutting time pressure short, not by a lack of knowledge. Owners who can spot these mistakes during the install save themselves years of downstream problems.
The ten most common mistakes I see, ranked by long-term cost impact.
First, skipping the vacuum step. A proper installation runs a vacuum pump on the connected refrigerant lines for at least 15 minutes to remove air and moisture before releasing the pre-charged gas. Air and moisture in the lines cause acid formation, corrode internal components, and shorten compressor life by years. This is the number one shortcut.
Second, no torque wrench on copper joints. Hand-tight or pliers-tight flared joints leak slowly over months and years. A proper installer uses a torque wrench calibrated to the unit's specification at every connection.
Third, indoor unit not tilted toward drain. Without the 3-degree tilt toward the drain side, condensate water pools and drips from the front of the unit during humid weather. A spirit level check during stage three of installation prevents this entirely.
Fourth, outdoor unit too close to a hot wall or in direct afternoon sun without shade. Discussed above under placement rules. The performance and life impact is severe and not recoverable later.
Fifth, sharing the AC circuit with other appliances. The dedicated MCB rule discussed above. Skipped in approximately one in three urban installations in our network experience.
Sixth, drainage pipe with upward kink creating water-trap. Algae and biofilm build up at the kink within months and block the drain. Indoor leakage begins in year two onward.
Seventh, wall sleeve not sealed properly with foam and putty. An unsealed sleeve lets rain water seep along the copper pipe into the wall cavity. Wall paint peels within one monsoon, internal damp develops over two to three years.
Eighth, insufficient insulation on copper suction line. Thin or partial insulation causes condensation on the pipe surface during operation, which then drips inside ceilings and along walls.
Ninth, no proper earth connection on the outdoor unit. Required for both safety and PCB protection. Easy to skip if the apartment's earthing infrastructure is weak, but the technician must verify and connect it.
Tenth, cheap generic bracket on an above-1.5-ton unit. Bracket failure in year three to five is one of the more dangerous installation failures because the outdoor unit can fall, particularly hazardous in high-rise installations.
For the complete inspection checklist owners can use during their installation, see our AC installation mistakes checklist guide.
Get quotes from verified, top-rated AC Service & Repair pros in Delhi.
When I train new installers for the ProNearMe network, the first thing I teach is the torque wrench. The second is the vacuum pump. If a trainee gets those two right, the rest of the work follows. I have seen ₹65,000 inverter ACs killed in year four because the installer skipped a 12-minute vacuum step on day one, and the homeowner had no way of knowing.
Day-of Installation Checklist
The day your installer arrives is your one and only chance to verify the work is being done properly. Once they leave and the wall is sealed, what is inside that copper pipe and how tight the joints are becomes invisible. Use this checklist to walk through the install.
Before the installer starts. Confirm the installer's NSDC Mechanic-RAC certification ID or ITI trade certificate, ask for the standard installation kit list, agree on the work scope in writing including any additional copper, additional drainage, and MCB upgrade.
During the indoor mount. Verify the wall mounting plate is anchored with proper bolts into solid masonry, check the 3-degree tilt toward the drain side using your phone's built-in spirit level app, confirm the indoor unit's height clears any ceiling fan or curtain rod by at least 15 centimetres.
During the wall sleeve and outdoor mount. Confirm the wall sleeve diameter matches the pipe bundle plus insulation cleanly, watch the outdoor bracket being anchored with the correct bolt depth into solid masonry not plaster, verify the airflow clearance specifications around the outdoor unit are met, confirm the bracket type matches your floor and city (stainless if coastal).
During the copper pipe routing. Watch the installer use a flaring tool at both ends of the pipe, confirm a torque wrench is used at each connection, verify the insulation runs continuously from indoor to outdoor with no gaps, check the drainage pipe runs downward all the way to discharge with no upward kinks.
During the electrical connection. Confirm the dedicated MCB rating matches the unit specification, verify the earth wire is connected at the outdoor unit terminal block, check the cable gauge looks correct for the tonnage.
During the vacuum and commissioning. Watch the vacuum pump run for at least 15 minutes (longer for pipe runs over 5 metres), confirm the manifold gauge shows a stable vacuum hold before gas release, watch the installer open the service valves with an Allen key to release the pre-charged refrigerant, run the AC for at least 15 minutes and verify cool air output, drainage flow at the outdoor discharge point, and no abnormal vibration at the outdoor bracket.
Before signing the invoice. Demand an itemised quote with materials, labour, and GST shown separately. Get a written workmanship warranty (minimum one year on installation work is standard practice in 2026). Take a photograph of the MCB labelling, the outdoor bracket, and the wall sleeve seal for your records.
For the printable day-of checklist plus the questions to ask at each stage, see our new AC day of setup checklist.
Installation Timeline and Realistic Schedule
| Stage | Standard time | Pipe run over 5 metres | Multiple ACs (per additional unit) |
| Site survey (separate visit) | 30 to 45 minutes | Same | Same |
| Indoor unit mount | 30 to 45 minutes | Same | 25 to 35 minutes |
| Wall sleeve and outdoor mount | 45 to 60 minutes | 60 to 75 minutes | 35 to 50 minutes |
| Copper piping and drainage | 45 to 60 minutes | 75 to 90 minutes | 40 to 55 minutes |
| Electrical connection | 30 to 45 minutes | Same | 20 to 30 minutes |
| Vacuum and commissioning | 30 to 45 minutes | 45 to 60 minutes | 25 to 35 minutes |
| Functional test and handover | 15 to 20 minutes | Same | 10 to 15 minutes |
| Total per single split AC | 3 to 4 hours | 4 to 5 hours | + 2 to 2.5 hours per additional |
A few realistic notes on this timeline. Society and RWA approval paperwork, when required, is typically done as a separate step before the installer arrives and is not in this timeline. Sites with monsoon-period scheduling sometimes lose half a day to weather. Sites with first-time owners learning the unit's operation extend the handover by 20 to 30 minutes, which is time well spent.
Society and RWA Approval Reality
Most Indian apartments built after 2010 require formal society or RWA approval for outdoor AC unit placement. This is not bureaucracy for its own sake. The rules typically exist to protect the building exterior, manage the visual uniformity of outdoor unit placement, and prevent installations that interfere with neighbours.
Common society approval requirements. Outdoor unit placement only on specific approved walls or balcony positions, the bracket must be installed at a specified height and not visible from the main entrance road, the drainage discharge must connect to the building's storm drain not just spill onto the wall, the installation work must be completed by a society-approved or insured installer.
What to ask your society. The list of approved outdoor unit positions for your flat, the application form and timeline for approval (typically 7 to 14 days), the security deposit requirement if any, the timing restrictions on installation work (most societies restrict drilling and noise work to weekday daytime hours).
Common reasons societies reject AC installation applications. Outdoor unit on a wall visible from the front of the building, drainage discharge onto a neighbour's window or balcony, installation work scheduled during the monsoon when wall drilling is restricted in some buildings, choice of installer not on the society's approved list.
For the complete society approval workflow including sample application templates and how to handle a rejection, see our society approval AC installation India guide.
DIY versus Technician-Only Work
Some parts of AC installation and ongoing maintenance are legitimately DIY-friendly for an Indian homeowner. Other parts must never be attempted by anyone without NSDC Mechanic-RAC certification. The dividing line is clear and not negotiable.
Safe DIY work. Filter washing every 2 to 4 weeks during peak summer use, drainage pipe outlet clearing from outside the unit if water is pooling, outdoor unit visual inspection for debris in the fan guard, remote battery replacement, MCB reset, scheduling annual maintenance with a certified technician.
Technician-only work. Any refrigerant handling (regulated under MoEF&CC ozone-depleting substance rules and NSDC Mechanic-RAC certification requirements), the full installation including all seven stages above, copper pipe flaring and connection, electrical work inside the indoor or outdoor unit, any opening of the indoor or outdoor casing beyond the filter access panel.
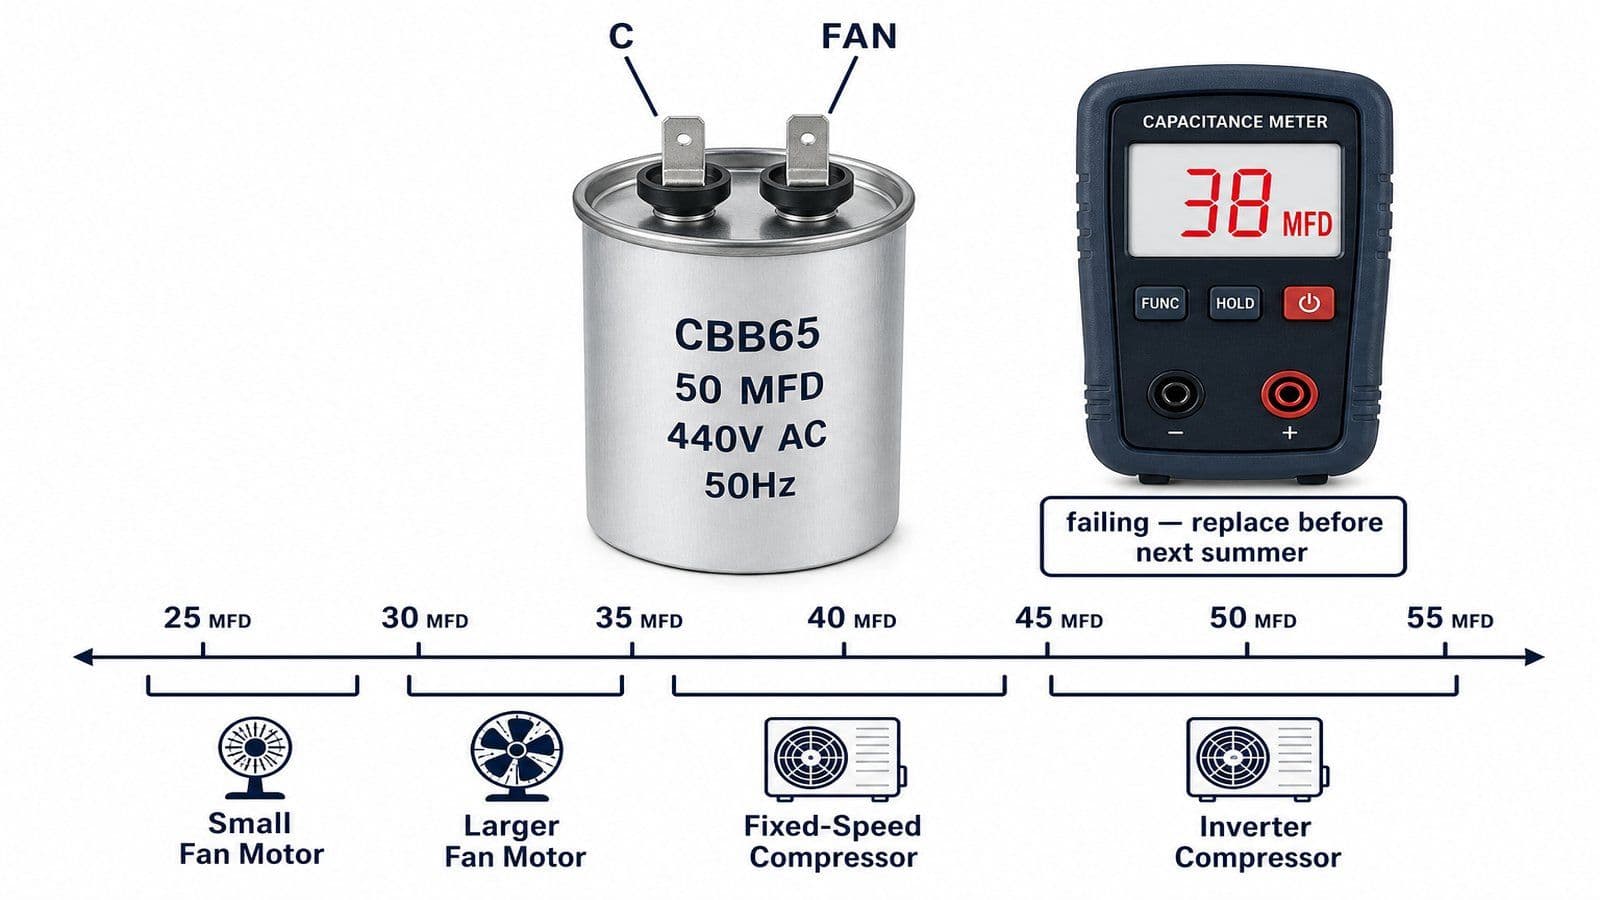
The compelling reason to draw this line strictly. Indoor and outdoor capacitors carry residual mains voltage for several minutes after disconnection. Refrigerant under pressure can cause eye injury if a connection fails during opening. Improper electrical work creates fire risk. And unauthorised installation voids most brand warranties immediately. The savings from DIY installation work are never worth these risks.
Warranty Implications of Unauthorised Installation
Every major AC brand in India in 2026 voids the compressor warranty if the unit is installed by a non-authorised technician. Many also void the full unit warranty for the first year. The exact terms vary by brand but the pattern is consistent.
What "authorised installation" typically means. The installer is either employed directly by the brand or by an aggregator platform that the brand recognises, the installer's name and certification ID is recorded on the warranty card, the installation date is registered with the brand within a specified window (commonly 14 to 30 days from purchase), and the AC is registered against the customer's address.
Two specific warranty traps to avoid. First, buying an AC online or from a non-brand-authorised retailer and then arranging your own installation through a freelance technician. Even if the technician is genuinely NSDC certified, the brand will not accept the installation as authorised, and the warranty defaults from comprehensive to basic at the brand's discretion. Second, having the installer offer a "complimentary one-year warranty in case of any issue" instead of registering the unit properly with the brand. This means you have a warranty from the installer (who may not exist in two years) rather than from the manufacturer.
The right approach. Buy from a brand-authorised retailer or directly through brand channels, schedule installation through the brand's own service portal or app, and confirm the installation has been registered with the brand by checking your customer service number within 14 days of installation.
AC Relocation Process
If you are moving home and want to take your existing AC with you, the relocation process is genuinely complex. Unlike a fresh installation, a relocation has the added work of safely uninstalling the existing setup, recovering the refrigerant under MoEF&CC rules, transporting the unit without damage, and re-installing at the new location often with new copper piping and bracket. Typical 2026 relocation cost runs ₹3,500 to ₹7,500 for a 1.5 ton split, well above the cost of a fresh installation of an already-on-site unit.
Common relocation pitfalls. Releasing the refrigerant directly into the atmosphere instead of recovering it (illegal under MoEF&CC ozone-depleting substance rules and harmful to long-term system pressure), reusing damaged copper pipe instead of installing fresh pipe, skipping the vacuum step at the new location because "the unit is already charged", and failing to seal the old wall sleeve which causes wall damage at your previous home.
For the complete step-by-step relocation workflow including the proper refrigerant recovery procedure and the new-site readiness checklist, see our AC relocation process India guide.
Monsoon-Readiness Rules for Outdoor Unit Position
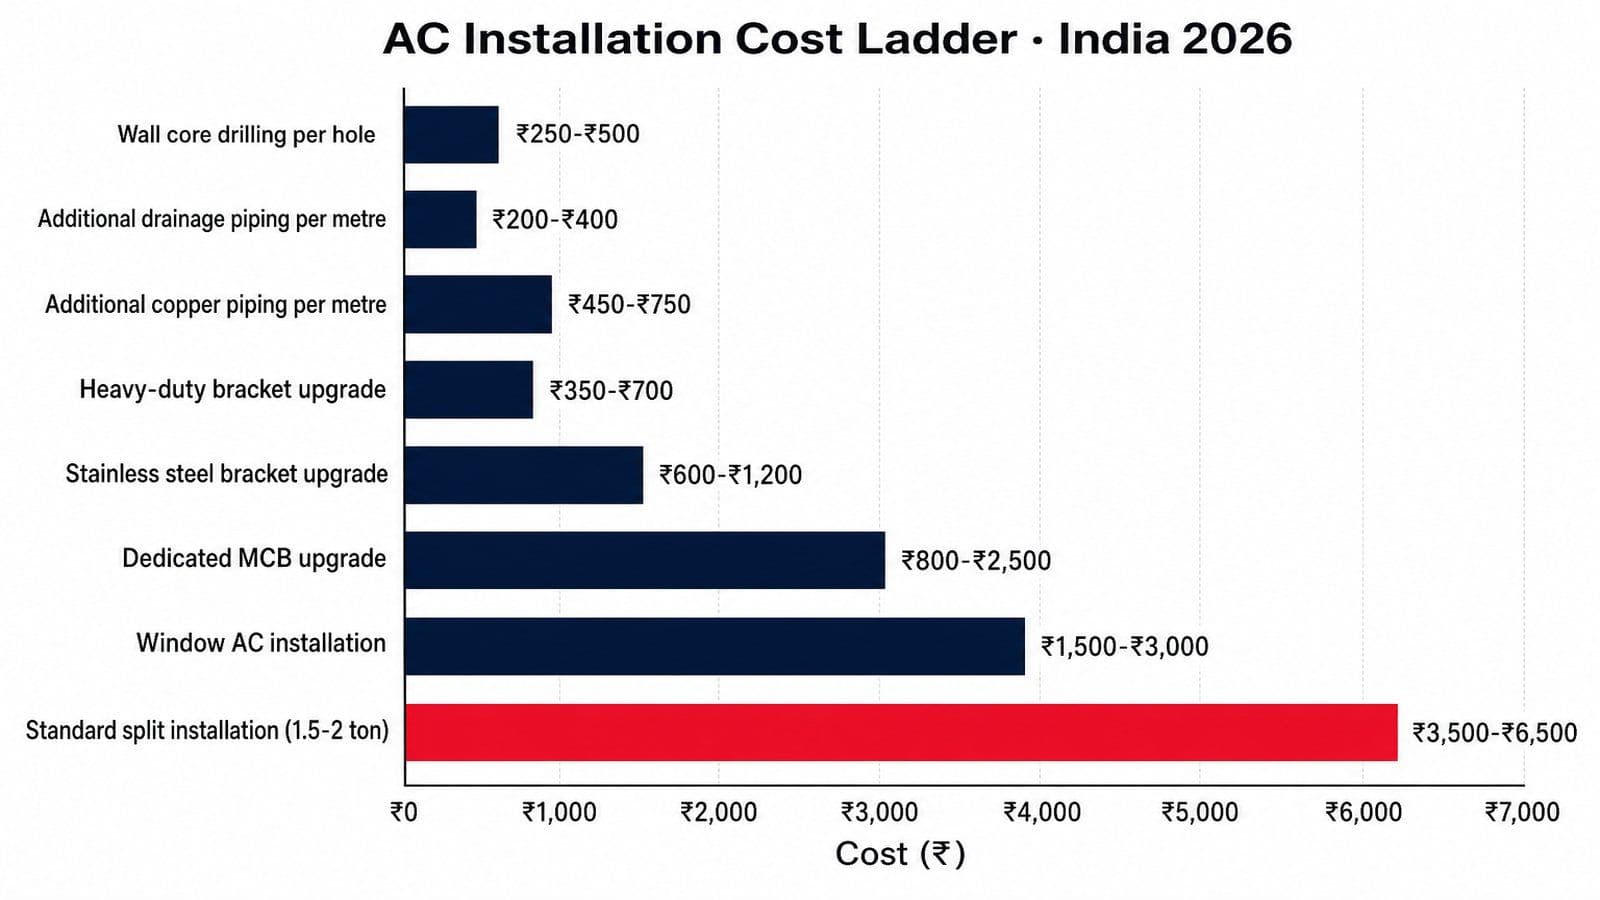
Photo: AC installation cost ladder India 2026
Indian monsoons are particularly hard on AC outdoor units. Heavy rain, salt-laden air in coastal cities, sudden voltage swings during storms, and the long humid season together account for the majority of outdoor unit failures we see. Several placement decisions during installation determine how well the unit survives the next ten monsoons.
The protection rules. The outdoor unit should be mounted above the historical maximum monsoon water level in your area, with 30 centimetres ground clearance as minimum and 45 centimetres in coastal cities. A small canopy or overhang above the unit shelters it from direct rainfall and reduces the long-term water ingress through the top vents. The bracket should be stainless steel if you are in a coastal city, galvanised steel inland but never bare mild steel. The drainage routing should be checked at the start of each monsoon to ensure no debris from the pre-monsoon period is blocking the outlet.
The electrical protection. A whole-home surge protection device installed at the main distribution board protects the AC outdoor PCB from lightning-induced voltage spikes that are common during Indian monsoons. The protective neighbourhood approach is gaining ground in modern Indian apartments and is worth the ₹3,500 to ₹6,500 cost.
The seasonal service. A pre-monsoon service in late May or early June (depending on your region's monsoon onset) includes outdoor coil cleaning, drainage line clearing, electrical terminal tightening, and a check of the bracket and wall sleeve seal. This single service prevents most monsoon-related failures and runs ₹800 to ₹1,500.
Installation Cost Breakdown India 2026
Here is the realistic 2026 installation cost ladder for an Indian metro. Tier 2 and tier 3 cities run 15 to 25 percent below these numbers, and authorised brand service installations typically sit 20 to 35 percent above independent NSDC-certified installers for equivalent work.
| Cost component | 2026 typical range | Notes |
| Standard installation (1.0 to 1.5 ton split) | ₹2,800 to ₹4,500 | Includes first 3 metres copper, basic bracket, standard drainage |
| Standard installation (1.5 to 2.0 ton split) | ₹3,500 to ₹6,500 | Includes first 3 metres copper, basic bracket, standard drainage |
| Window AC installation | ₹1,500 to ₹3,000 | Includes wooden frame, sealing, basic electrical |
| Cassette AC installation | ₹6,000 to ₹12,000 | False ceiling work additional |
| Additional copper piping (per metre) | ₹450 to ₹750 | Includes insulation |
| Additional drainage piping (per metre) | ₹200 to ₹400 | PVC pipe with insulation |
| Stainless steel bracket upgrade (coastal) | ₹600 to ₹1,200 | Above standard galvanised |
| Heavy-duty bracket (2 ton plus) | ₹350 to ₹700 | Above standard L-bracket |
| Dedicated MCB upgrade (16A or 20A) | ₹800 to ₹2,500 | Including cable run to AC point |
| Voltage stabiliser (where required) | ₹2,500 to ₹6,000 | Sized to AC tonnage |
| Wall core drilling per hole | ₹250 to ₹500 | Standard included in base for first hole |
| Additional refrigerant for long pipe run | ₹400 to ₹800 per metre over 5 m | Calculated from unit specification |
| Society approval coordination fee | ₹0 to ₹500 | Some installers charge for documentation help |
| Same-day installation surcharge | ₹500 to ₹1,500 | Common during peak summer demand |
| Annual maintenance contract (post-install) | ₹2,500 to ₹6,500 per AC per year | Typically two scheduled services |
Three rules for using this table. First, demand an itemised quote with each component shown separately before any work starts. A combined "all-inclusive ₹3,500" quote is the single biggest sign of materials being cut to meet a price point. Second, the copper piping is the largest variable cost beyond the base installation and the easiest place for the installer to substitute inferior material. Insist on refrigeration-grade copper with proper insulation. Third, the cheap installation quote you accept today often results in 30 to 50 percent higher service costs across the unit's life.
For the complete 2026 installation cost reference including city-by-city variation and the brand authorised versus independent comparison, see our AC installation cost breakdown India 2026 guide.
The cost gap between a cheap installer and a good one is rarely more than ₹2,000 on a ₹35,000 AC. Across the ProNearMe network, units installed by certified technicians using torque wrenches and vacuum pumps run 3 to 4 years longer on average than units installed by the cheapest available crew. Pay the ₹2,000 difference once, save ₹15,000 over the unit's lifetime in avoided repair calls and shortened life.
Get quotes from verified, top-rated AC Service & Repair pros in Delhi.
Case Study: A Real Installation Done Right
Two months ago Mr. Rajesh Krishnan in Whitefield, Bengaluru, called us to install two split ACs in a 3 BHK he had just moved into. The flat is on the seventh floor of a 12-year-old society with strict outdoor unit placement rules and a recent history of bracket failure incidents in the neighbouring tower.
The pre-installation work took longer than the install itself. The site survey identified that the previous owner had used the wrong outdoor positions in violation of the latest society guidelines, so the new installations had to use revised positions on the east and north walls. Society approval took 11 days. The MCB box was inspected and found to have only a single 6A circuit serving the entire bedroom wing, which would have tripped repeatedly under AC load. The electrical work required adding two dedicated 16A circuits with fresh cable runs from the main distribution board.
Day-of installation took 6 hours for both units. The team used stainless steel brackets given Bengaluru's monsoon intensity (though not coastal, the city's monsoon water exposure justifies the upgrade in our experience), ran 4 metres of copper to each outdoor unit with proper torque-wrench connections, vacuumed each set of lines for 20 minutes, and registered both units with the brand on the same day.
Itemised invoice came to ₹13,200 for both units (₹6,600 each) including the bracket upgrade, the MCB work, the additional copper, and the registration coordination. Mr. Krishnan asked at the time why this was 40 percent higher than the cheapest quote he had received from another platform. The answer is in the seven-stage workflow above. Six months later, both units have passed their first monsoon without a single service call.
Choosing the Right Installer
The installer you pick decides more about your AC's next decade than the brand you bought. Use the same seven-point checklist we recommend for repair work, adjusted for installation context.
NSDC Mechanic-RAC or ITI Certification
Ask to see it. The NSDC registry is publicly verifiable online. For installation work specifically, look for the Mechanic-RAC certification level that includes refrigerant handling competence.
Brand Authorisation for Warranty Registration
Critical for installation specifically. An unauthorised installer voids your warranty. Confirm the installer is on your brand's authorised list before the installation date.
Itemised Written Quote Before Work Starts
Parts, labour, materials, and GST shown separately. The standard installation cost should be quoted upfront, with any additional materials (extra copper, MCB upgrade, bracket upgrade) noted as line items with unit prices.
Pre-Installation Site Survey
A good installer does a site survey before installation day, ideally during the purchase decision. The survey identifies any additional materials needed, society approval requirements, and electrical work scope. Installers who skip the site survey are often the same ones who skip the vacuum step.
Proper Tools Visible on Arrival
Vacuum pump, manifold gauge set, torque wrench with the correct Newton-metre range, flaring tool, spirit level, anchor drill with proper masonry bits, and crimping tools. If the installer arrives with only a basic toolkit, the installation will be cut short on quality.
Written Workmanship Warranty
Minimum one year on installation work is standard practice in 2026 for legitimate installers. Get the warranty in writing on the invoice with the installer's contact details.
Reviewable Work History
Either through aggregator platforms with itemised reviews, or referrals from people you can actually call. For installation specifically, ask reviewers about whether their AC has needed service in the first 18 months. A good installation shows no service need until the first scheduled annual maintenance.
I would not hire any installer who fails two of these seven checks. The first failure can sometimes be explained. Two failures mean the operation is not equipped to do a proper installation on a 10-year asset in your home.
The installer who shows up with a torque wrench in hand has already told you something important about how they work. In our ProNearMe network onboarding, we reject roughly 40 percent of applicants in the practical tool-handling round, and almost every rejection traces to the same gap: no torque wrench in the kit, no vacuum pump in the van, or a flaring tool that has been worn smooth from years of misuse. The tools tell you more than the certification card does.
Safety Notes for Installation Day
Three safety rules for owners during the installation visit.
Never Touch the Outdoor Unit During Vacuum
The vacuum pump pulls negative pressure on the connected refrigerant lines. Opening any service valve or connection during the vacuum cycle can cause sudden pressure equalisation. Stay clear during this stage.
Never Accept "Pre-Charged Lines, No Vacuum Needed"
This is a common installer shortcut. Modern split ACs ship with a refrigerant charge in the outdoor unit only, sized for a standard pipe run. The connected lines between indoor and outdoor still need vacuuming to remove air and moisture before the pre-charge is released into the full system. Any installer telling you the vacuum step is unnecessary is cutting corners that will damage your compressor over time.
Never Allow Refrigerant Recovery to Be Skipped at Relocation
If you are relocating an existing AC, the refrigerant must be recovered into a recovery cylinder before the unit is disconnected. Releasing it to the atmosphere is illegal under MoEF&CC ozone-depleting substance rules and damages future cooling performance.
For the BIS-aligned residential AC installation reference standards and the NSDC Mechanic-RAC competency framework, the standards organisations publish guidance for both installers and owners.
Conclusion
The ac installation framework in this guide is built around a simple observation. The four hours your installer spends on day one decides more about your AC's next ten years than the brand badge on the front of the indoor unit. Three things separate a proper installation from a rushed one: a dedicated MCB on its own circuit, a torque wrench used at every copper connection, and a vacuum pump that runs for at least 15 minutes before the gas is released. Owners who verify these three things during the install rarely have a service call before year three. Owners who do not, almost always have one within 18 months.
Your next step depends on where you are in the journey. If you are still choosing between split, window, and cassette, the format section above and the dedicated cluster guides for each format will get you to the right pick. If you have already bought the unit and the installer is coming this week, walk through the day-of checklist before they arrive and watch the seven stages as the work progresses. If your install is complete and you suspect corners were cut, schedule an independent inspection now rather than waiting for the first failure. Across the ProNearMe network we report that 58 percent of AC installation problems caught within 30 days of the original install can be remedied without significant additional cost, while problems caught after 6 months typically require a full reinstall.
Disclaimer
The cost ranges, installation specifications, and service intervals in this guide reflect typical Indian-market conditions as of May 2026. Actual prices vary by city, AC capacity, brand, GST treatment, society or RWA requirements, and the individual installer you hire. Always obtain an itemised written quote with materials, labour, and GST shown separately before authorising any AC installation. For decisions specific to your home, electrical infrastructure, and society approval requirements, consult a licensed AC installer with NSDC Mechanic-RAC certification and brand authorisation for warranty registration. ProNearMe does not endorse specific brands or installers; brand mentions in this article are illustrative of the Indian market context.
Sources & References
- Bureau of Indian Standards (BIS), IS 1391 Part 1 and Part 2 specification for room air conditioners covering electrical safety, performance, and labelling requirements
- Bureau of Energy Efficiency (BEE), Revised ISEER thresholds and star labelling framework for room air conditioners effective January 2026
- National Skill Development Corporation (NSDC), Mechanic-RAC Refrigeration and Air Conditioning qualification pack and certification framework for installation and service work
- National Building Code of India (NBC 2016), Part 8 on Building Services including provisions for residential electrical installations and air conditioning system requirements
- Ministry of Environment, Forest and Climate Change (MoEF&CC), Ozone Depleting Substances Rules and refrigerant handling and recovery requirements under the Kigali Amendment
- Central Electricity Authority (CEA), Indian residential electrical practice and circuit design guidance for high-load appliances
- Ministry of Power (MoP), Energy Conservation Building Code and notifications relevant to residential efficiency standards
- Indian Society of Heating, Refrigerating and Air Conditioning Engineers (ISHRAE), industry data on residential AC installation trends published through the COOL Conclave residential systems track
- Press Information Bureau (PIB), Government's Star Labelling Programme efficiency improvements for residential air conditioners and consumer guidance updates
- Bureau of Energy Efficiency, Insights from the 2024 Household Survey on Residential Energy and air conditioning adoption patterns

Amit worked as an AC technician for 6 years in Ahmedabad before transitioning to technical writing. He holds a diploma in Refrigeration and Air Conditioning from ITI Ahmedabad and understands the difference between what AC companies promise and what actually happens on the ground. His articles break down complex technical topics into plain language that any homeowner can follow. He tests every tip he writes about in his own home first.

Dr. Verma is a mechanical engineer with 15 years of experience in HVAC systems. She completed her PhD from IIT Delhi on energy-efficient cooling solutions for Indian residential buildings. She reviews all technical content on HomePros to make sure the numbers are right, the advice is safe, and the recommendations are backed by actual engineering principles. She consults for multiple AC manufacturers on product design.